Set Up Minecraft Server
tags: CraftLab
0. (Optional) Create dedicated namespace
Run:
kubectl create namespace crafty
From now on, add -n crafty to each kubectl command (or include namespace: crafty in your YAML).
1. Provisioning Persistent Storage
Create directory on the node so Kubernetes can mount it into your Pod
# create the directories (if doesn’t exist)
sudo mkdir -p /mnt/data/crafty-config
sudo mkdir -p /mnt/data/crafty-servers

# make sure it’s writable by root (default is fine) or adjust ownership
sudo chown root:root /mnt/data/crafty-config /mnt/data/crafty-servers

# optionally tighten permissions if you like
sudo chmod 755 /mnt/data/crafty-config /mnt/data/crafty-servers
Once that’s in place, your PersistentVolume will bind to /mnt/data/crafty-config and /mnt/data/crafty-servers.Crafty will have a place to store its config, world data, backups, etc. After creating the folders we need to create PV and PVC YAML to define persistent volumes.
PersistentVolume (hostPath for now):
Crafty needs disk space for its config, database, backups and any Minecraft server files you create. Create the file crafty-pv.yaml
macc@craftlab:~$ vi crafty-pvs.yaml
File editor:
apiVersion: v1
kind: PersistentVolume
metadata:
  name: crafty-config-pv
spec:
  capacity:
    storage: 5Gi   # adjust size to your needs
  accessModes:
    - ReadWriteOnce
  persistentVolumeReclaimPolicy: Retain
  hostPath:
    path: /mnt/data/crafty-config  # adjust to the directories created in the previous step
---
apiVersion: v1
kind: PersistentVolume
metadata:
  name: crafty-servers-pv
spec:
  capacity:
    storage: 20Gi
  accessModes:
    - ReadWriteOnce
  persistentVolumeReclaimPolicy: Retain
  hostPath:
    path: /mnt/data/crafty-servers
~
~
~
~
:
PersistentVolumeClaim:
Create the file crafty-pvc.yaml
macc@craftlab:~$ vi crafty-pvcs.yaml
File editor:
apiVersion: v1
kind: PersistentVolumeClaim
metadata:
  name: crafty-config-pvc
  namespace: crafty
spec:
  accessModes:
    - ReadWriteOnce
  resources:
    requests:
      storage: 1Gi
  volumeName: crafty-config-pv
---
apiVersion: v1
kind: PersistentVolumeClaim
metadata:
  name: crafty-servers-pvc
  namespace: crafty
spec:
  accessModes:
    - ReadWriteOnce
  resources:
    requests:
      storage: 20Gi
  volumeName: crafty-servers-pv
~
~
~
~
:
Apply files
Run the following commands:
kubectl apply -f crafty-pvs.yaml
kubectl apply -f crafty-pvcs.yaml
Output:
persistentvolume/crafty-pv created
persistentvolumeclaim/crafty-pvc created
Verify pvcs where created
kubectl get pvc -n crafty
Output:
NAME                 STATUS   VOLUME              CAPACITY   ACCESS MODES   STORAGECLASS   VOLUMEATTRIBUTESCLASS   AGE
crafty-config-pvc    Bound    crafty-config-pv    5Gi        RWO                           <unset>                 47m
crafty-servers-pvc   Bound    crafty-servers-pv   20Gi       RWO                           <unset>                 47m
2. Deploy Crafty Controller
This will run the Crafty web panel inside a Pod, mounting both pvs for config and world data (defining a Deployment manifest).
Create the file crafty-deployment.yaml
macc@craftlab:~$ vi crafty-deployment.yaml
File editor:
apiVersion: apps/v1
kind: Deployment
metadata:
  name: crafty
  namespace: crafty
spec:
  replicas: 1
  selector:
    matchLabels:
      app: crafty
  template:
    metadata:
      labels:
        app: crafty
    spec:
      securityContext:  # Ensuring we run the pod as admin
        runAsUser: 0
        runAsGroup: 0
        fsGroup:    0
      containers:
      - name: crafty
        image: registry.gitlab.com/crafty-controller/crafty-4:latest
        ports:
        - name: http
          containerPort: 8000
        - name: https
          containerPort: 8443
        - name: dynmap
          containerPort: 8123
        - name: bedrock
          protocol: UDP
          containerPort: 19132
        volumeMounts:
        - name: crafty-config  # For config data
          mountPath: /crafty/app/config
        - name: crafty-servers # For servers and world data
          mountPath: /crafty/servers
      volumes:
      - name: crafty-config
        persistentVolumeClaim:
          claimName: crafty-config-pvc
      - name: crafty-servers
        persistentVolumeClaim:
          claimName: crafty-servers-pvc

~
~
~
~
:
- Got latest crafty-controller image from: crafty-controller-docker
Apply manifest, run:
kubectl apply -f crafty-deployment.yaml
3. Expose the Crafty-Controller UI by creating a Kubernetes Service
- Define a Service manifest (e.g.,
crafty-controller-service.yaml) that allows external access to the Crafty Controller. - Choose an appropriate Service type (e.g., NodePort for direct access to node IPs, LoadBalancer for a cloud provider load balancer).
- Specify the port mappings to expose Crafty's ports.
Create the file crafty-controller.yaml
macc@craftlab:~$ vi crafty-ui-service.yaml
File editor:
apiVersion: v1
kind: Service
metadata:
  name: crafty-ui
  namespace: crafty
spec:
  type: NodePort
  selector:
    app: crafty
  ports:
  - port: 8000
    targetPort: 8000
    nodePort: 32000
  - port: 8443
    targetPort: 8443
    name: https
    protocol: TCP
  - port: 19132
    targetPort: 19132
    name: bedrock
    protocol: UDP
~
~
~
~
:
Apply manifest, run:
kubectl apply -f crafty-ui-service.yaml
4. Verify & test
Verify pod is running:
kubectl get pods -n crafty --watch
Output:
NAME                      READY   STATUS    RESTARTS   AGE
crafty-76f768fc68-dw4k6   1/1     Running   0          119s
See config files are present inside
POD=$(kubectl get pods -n crafty -l app=crafty -o jsonpath='{.items[0].metadata.name}')
kubectl exec -n crafty $POD -- ls -R /crafty/app/config
List /crafty/servers directory (empty at first)
kubectl exec -n crafty $POD -- ls -R /crafty/servers
Verify pod:
# kubectl logs <new-crafty-pod> -n crafty
kubectl logs crafty-76f768fc68-dw4k6 -n crafty
Output:
Wrapper | 🏗️  Config not found, pulling defaults...
Wrapper | 📋 Looking for problem bind mount permissions globally...
Wrapper | 📋 (1/3) Ensuring root group ownership...
Wrapper | 📋 (2/3) Ensuring group read-write is present on files...
Wrapper | 📋 (3/3) Ensuring sticky bit is present on directories...
Wrapper | ✅ Initialization complete!
find: './import': No such file or directory
Wrapper | 🚀 Launching crafty with [-d -i]
Logging set to: 0

    ///////////////////////////////////////////////////////////////////////////
    #                  Welcome to Crafty Controller - v.4.4.7                 #
    ///////////////////////////////////////////////////////////////////////////
    #          Server Manager / Web Portal for your Minecraft server          #
    #                     Homepage: www.craftycontrol.com                     #
    ///////////////////////////////////////////////////////////////////////////

[+] Crafty: 05/14/25 23:18:46 - INFO:   Starting migrations
[+] Crafty: 05/14/25 23:18:46 - INFO:   Starting Backups migrations
[+] Crafty: 05/14/25 23:18:46 - INFO:   Migrations: Adding columns [backup_id, backup_name, backup_location, enabled, default, action_id, backup_status]
[+] Crafty: 05/14/25 23:18:46 - INFO:   Cleaning up orphan backups for all servers
[+] Crafty: 05/14/25 23:18:46 - INFO:   Cleaning up orphan schedules for all servers
[+] Crafty: 05/14/25 23:18:46 - WARNING:        We have detected a fresh install. Please be sure to forward Crafty's port, 8443, through your router/firewall if you would like to be able to access Crafty remotely.
[+] Crafty: 05/14/25 23:18:46 - INFO:   Fresh Install Detected - Creating Default Settings
[+] Crafty: 05/14/25 23:18:46 - CRITICAL:       Default password too short using Crafty's created default. Find it in app/config/default-creds.txt
[+] Crafty: 05/14/25 23:18:47 - INFO:   Checking for reset secret flag
[+] Crafty: 05/14/25 23:18:47 - INFO:   No flag found. Secrets are staying
[+] Crafty: 05/14/25 23:18:47 - INFO:   Checking for remote changes to config.json
[+] Crafty: 05/14/25 23:18:47 - INFO:   Remote change complete.
[+] Crafty: 05/14/25 23:18:47 - INFO:   Initializing all servers defined
[+] Crafty: 05/14/25 23:18:47 - INFO:   Crafty started in daemon mode, no shell will be printed

[+] Crafty: 05/14/25 23:18:47 - INFO:   Generating a self signed SSL
[+] Crafty: 05/14/25 23:18:47 - INFO:   Generating a key pair. This might take a moment.
[+] Crafty: 05/14/25 23:18:47 - INFO:   Setting up Crafty's internal components...
[+] Crafty: 05/14/25 23:18:47 - INFO:   https://10.244.0.5:8443 is up and ready for connections.
[+] Crafty: 05/14/25 23:18:47 - INFO:   Server Init Complete: Listening For Connections!
[+] Crafty: 05/14/25 23:18:49 - INFO:   Stats collection frequency set to 30 seconds
[+] Crafty: 05/14/25 23:18:49 - INFO:   Launching Scheduler Thread...
[+] Crafty: 05/14/25 23:18:49 - INFO:   Launching command thread...
[+] Crafty: 05/14/25 23:18:49 - INFO:   Launching log watcher...
[+] Crafty: 05/14/25 23:18:49 - INFO:   Launching realtime thread...

[+] Crafty: 05/14/25 23:18:51 - INFO:   Checking Internet. This may take a minute.
[+] Crafty: 05/14/25 23:18:53 - INFO:   Execution Mode: Non-interactive (e.g. 'python main.py')
[+] Crafty: 05/14/25 23:18:53 - INFO:   Application path: '/crafty'
[+] Crafty: 05/14/25 23:18:54 - INFO:   Crafty has fully started and is now ready for use!
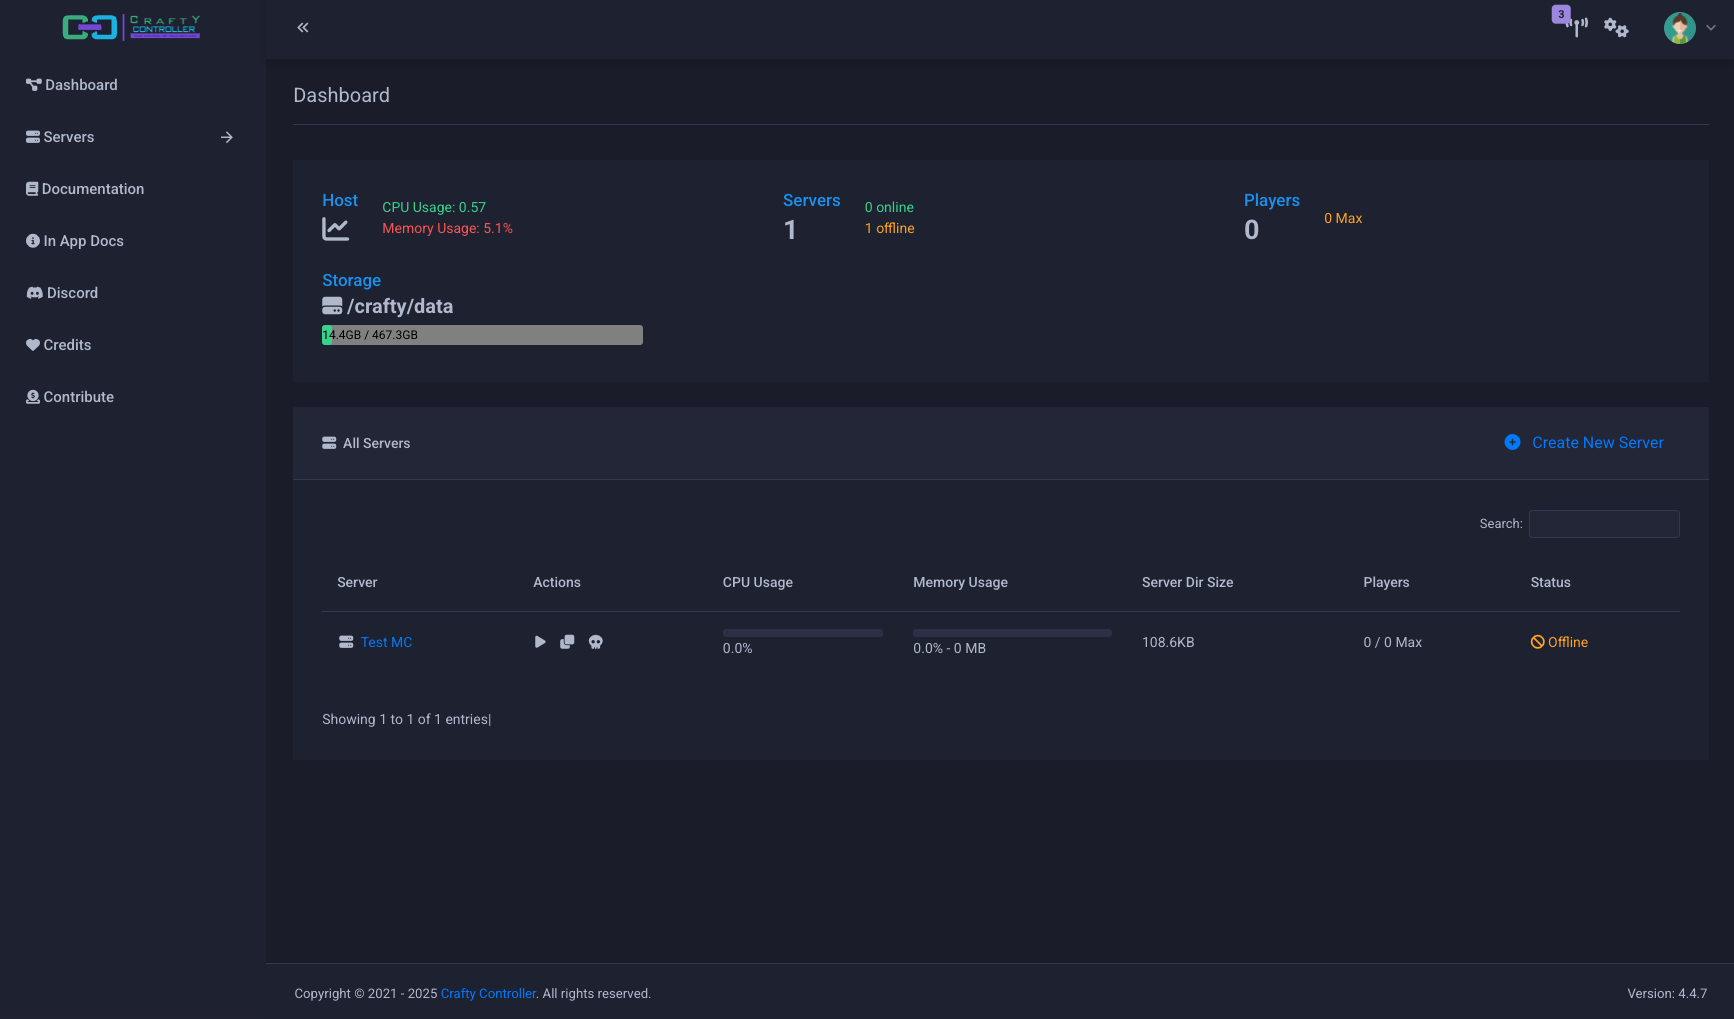
Check Endpoints & UI: Once the Pod is Running, your crafty-ui Service will pick up its endpoints:
kubectl describe svc crafty-ui -n crafty
Output:
Name:                     crafty-ui
Namespace:                crafty
Labels:                   <none>
Annotations:              <none>
Selector:                 app=crafty
Type:                     NodePort
IP Family Policy:         SingleStack
IP Families:              IPv4
IP:                       10.103.200.86
IPs:                      10.103.200.86
Port:                     http-ui  8000/TCP
TargetPort:               8000/TCP
NodePort:                 http-ui  32000/TCP
Endpoints:                10.244.0.5:8000
Port:                     https-ui  8443/TCP
TargetPort:               8443/TCP
NodePort:                 https-ui  32001/TCP
Endpoints:                10.244.0.5:8443
Port:                     bedrock  19132/UDP
TargetPort:               19132/UDP
NodePort:                 bedrock  32002/UDP
Endpoints:                10.244.0.5:19132
Session Affinity:         None
External Traffic Policy:  Cluster
Events:                   <none>
Now you should be able to browse to http://<NODE_IP>:32000
5. Access Crafty Controller UI
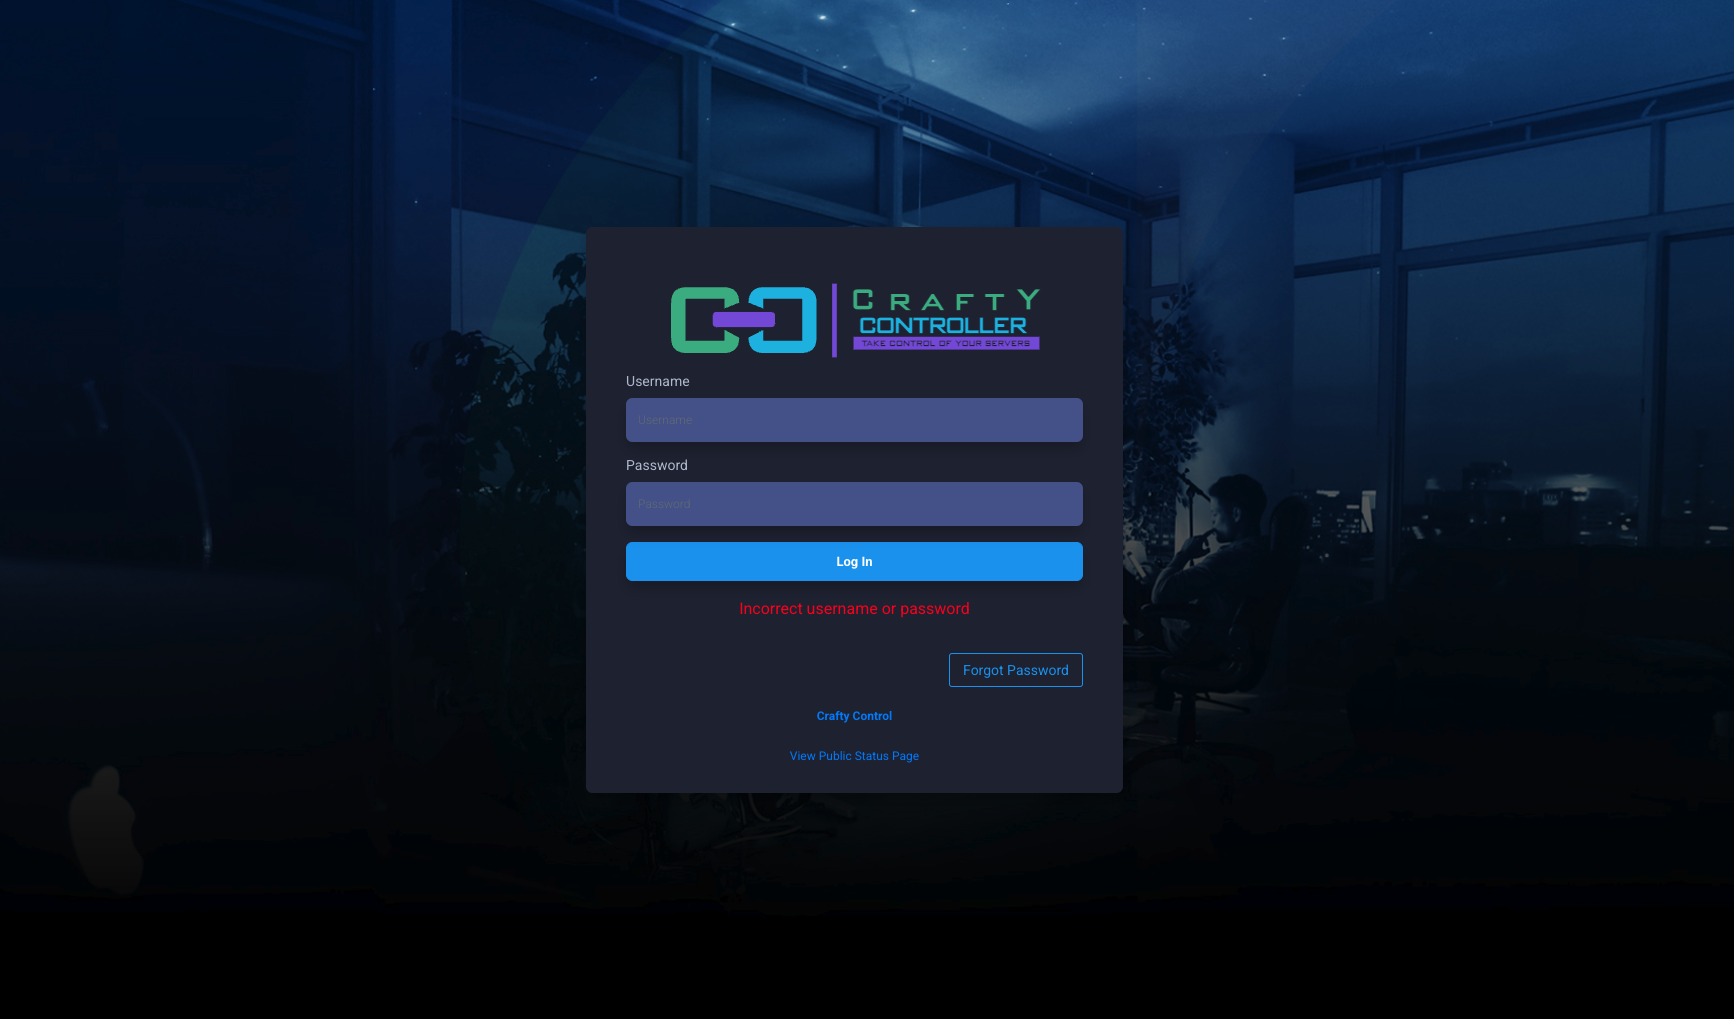
Open a browser and go to https://192.168.101.186:32001
This page will open up, sometimes you need to bypass google's security warning.
6. Get default username and password for crafty-controller
Cat credentials from pod
Find your Crafty Pod name:
kubectl get pods -n crafty -l app=crafty
Output:
NAME                      READY   STATUS    RESTARTS   AGE
crafty-76f768fc68-dw4k6   1/1     Running   0          96m
Exec in and cat the creds file:
# kubectl exec -n crafty <crafty-pod-name> -- \ cat /crafty/app/config/default-creds.txt
kubectl exec -n crafty crafty-76f768fc68-dw4k6 -- \cat /crafty/app/config/default-creds.txt
Output:
{
    "username": "admin",
    "password": "8gM*Am553zmcYFG6wQCBR7&3VTWa8vRu8sgK7CCzywTsrp4H9KmfwnAhI8#lA0mG",
    "info": "This is NOT where you change your password. This file is only a means to give you a default password."
}
Use those to log in, then immediately change the password in the UI.
Tip: if you had mounted /crafty directly to a hostPath like /mnt/data/crafty, you can also read the file on the host at /mnt/data/crafty/app/config/default-creds.txt
Change username and password
Use default credentials to log in, then go to configuration
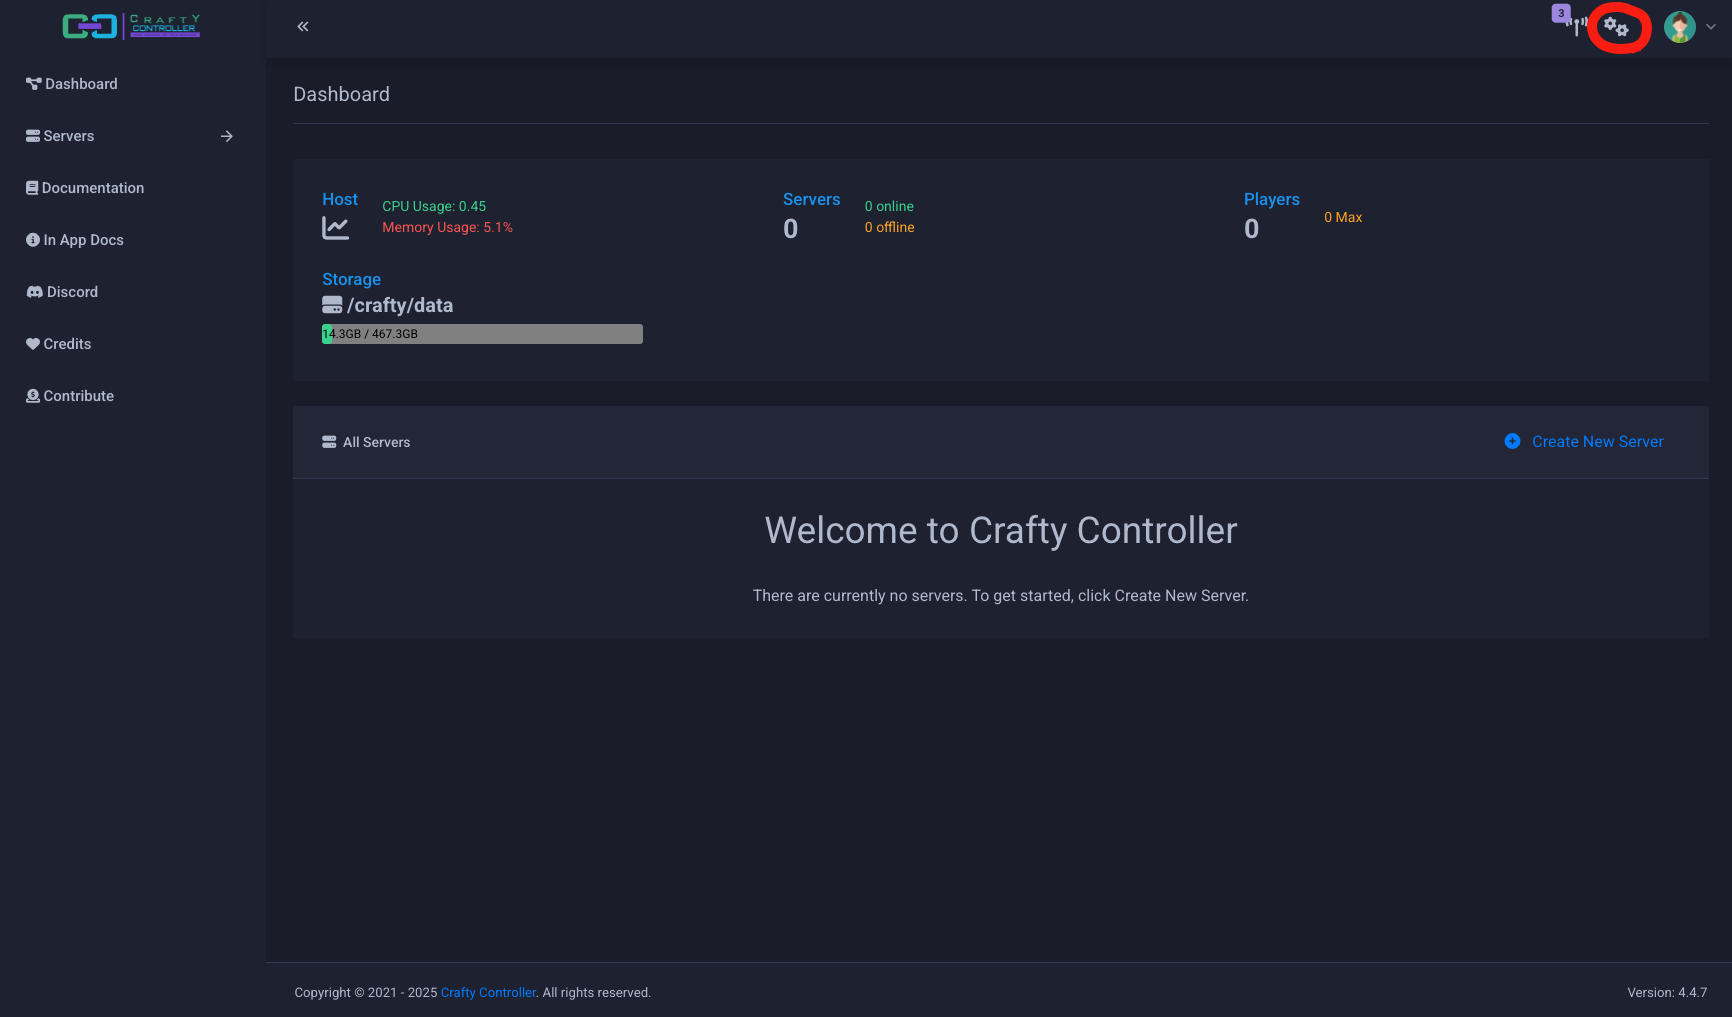
Click on "New Password"
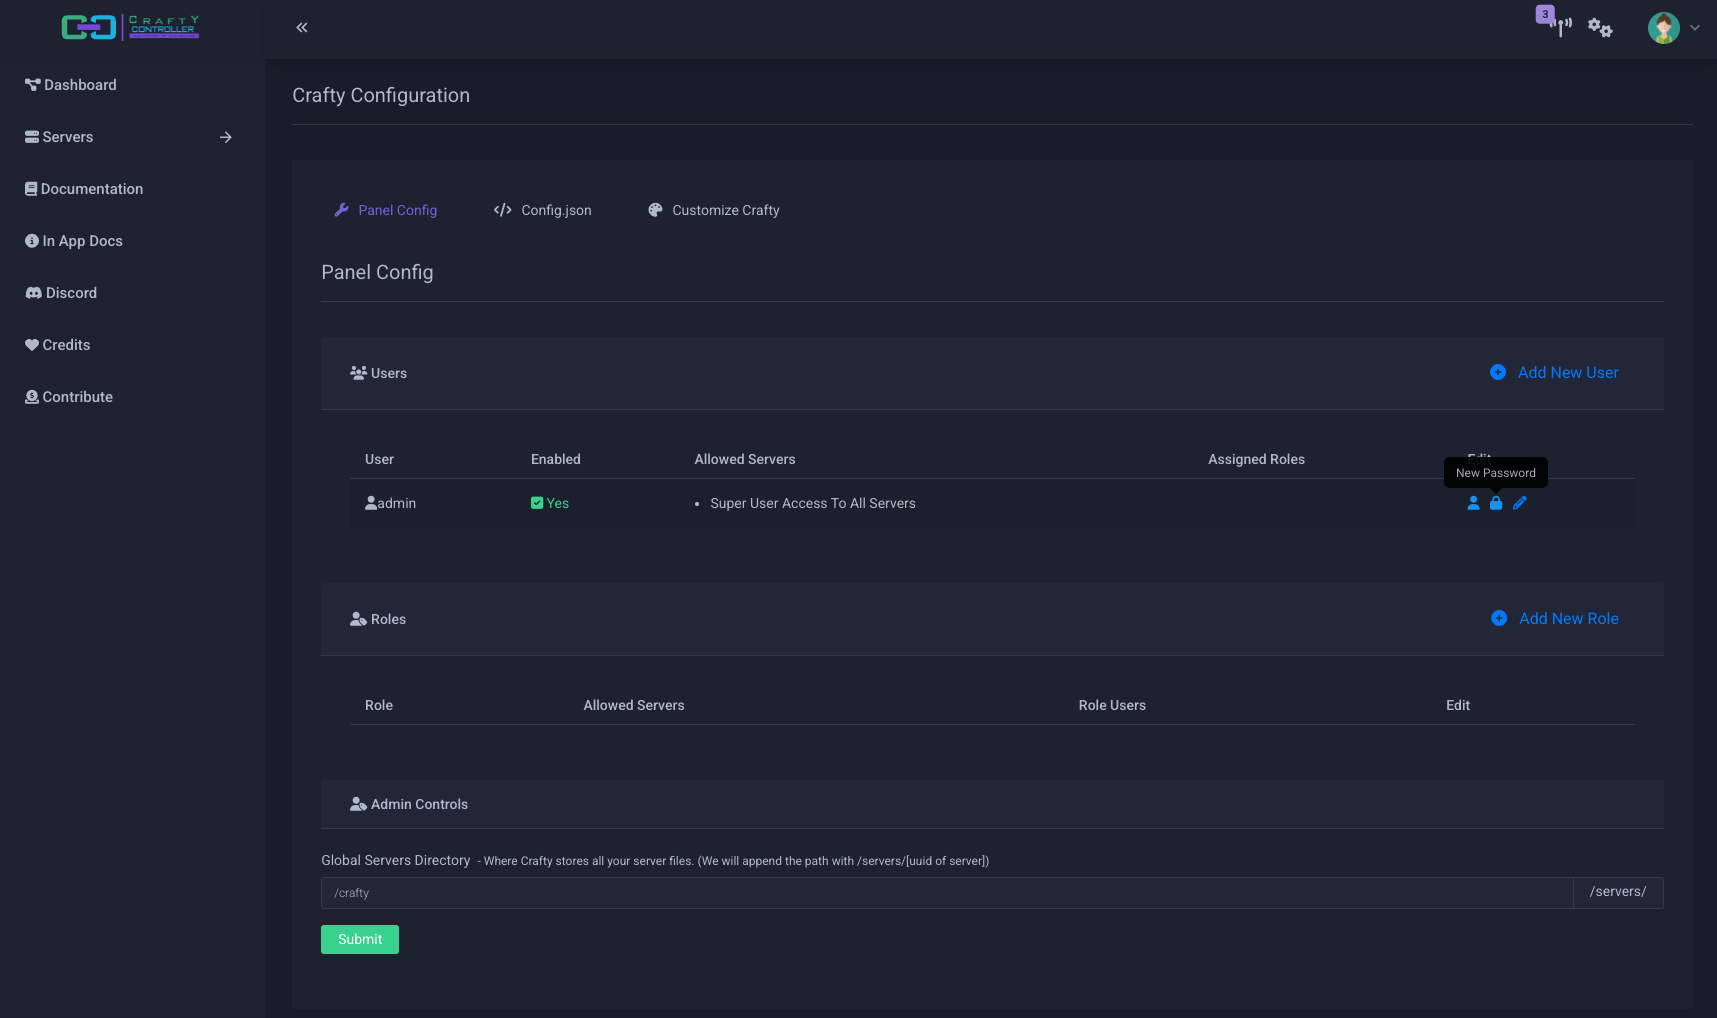
- Type password and verify
- Current password: piolacraft
7. Create a Kubernetes Minecraft Server Service
You need a Kubernetes Service for your Java server port:
Create a minecraft-service.yaml
vi minecraft-service.yaml
File editor:
# minecraft-service.yaml
apiVersion: v1
kind: Service
metadata:
  name: minecraft-server
  namespace: crafty
spec:
  type: NodePort
  selector:
    app: crafty
  ports:
    - name: java-edition
      protocol: TCP
      port: 25565
      targetPort: 25565
      nodePort: 30065   # or any free 30000–32767 port
Apply file:
kubectl apply -f minecraft-service.yaml
Verify the Service & Endpoints
kubectl get svc minecraft-server -n crafty
Output:
NAME               TYPE       CLUSTER-IP      EXTERNAL-IP   PORT(S)           AGE
minecraft-server   NodePort   10.106.122.60   <none>        25565:30065/TCP   49m
Verify Endpoints field is populated
kubectl describe svc minecraft-server -n crafty
Output:
Name:                     minecraft-server
Namespace:                crafty
Labels:                   <none>
Annotations:              <none>
Selector:                 app=crafty
Type:                     NodePort
IP Family Policy:         SingleStack
IP Families:              IPv4
IP:                       10.106.122.60
IPs:                      10.106.122.60
Port:                     java-edition  25565/TCP
TargetPort:               25565/TCP
NodePort:                 java-edition  30065/TCP
Endpoints:                10.244.0.5:25565
Session Affinity:         None
External Traffic Policy:  Cluster
Events:                   <none>
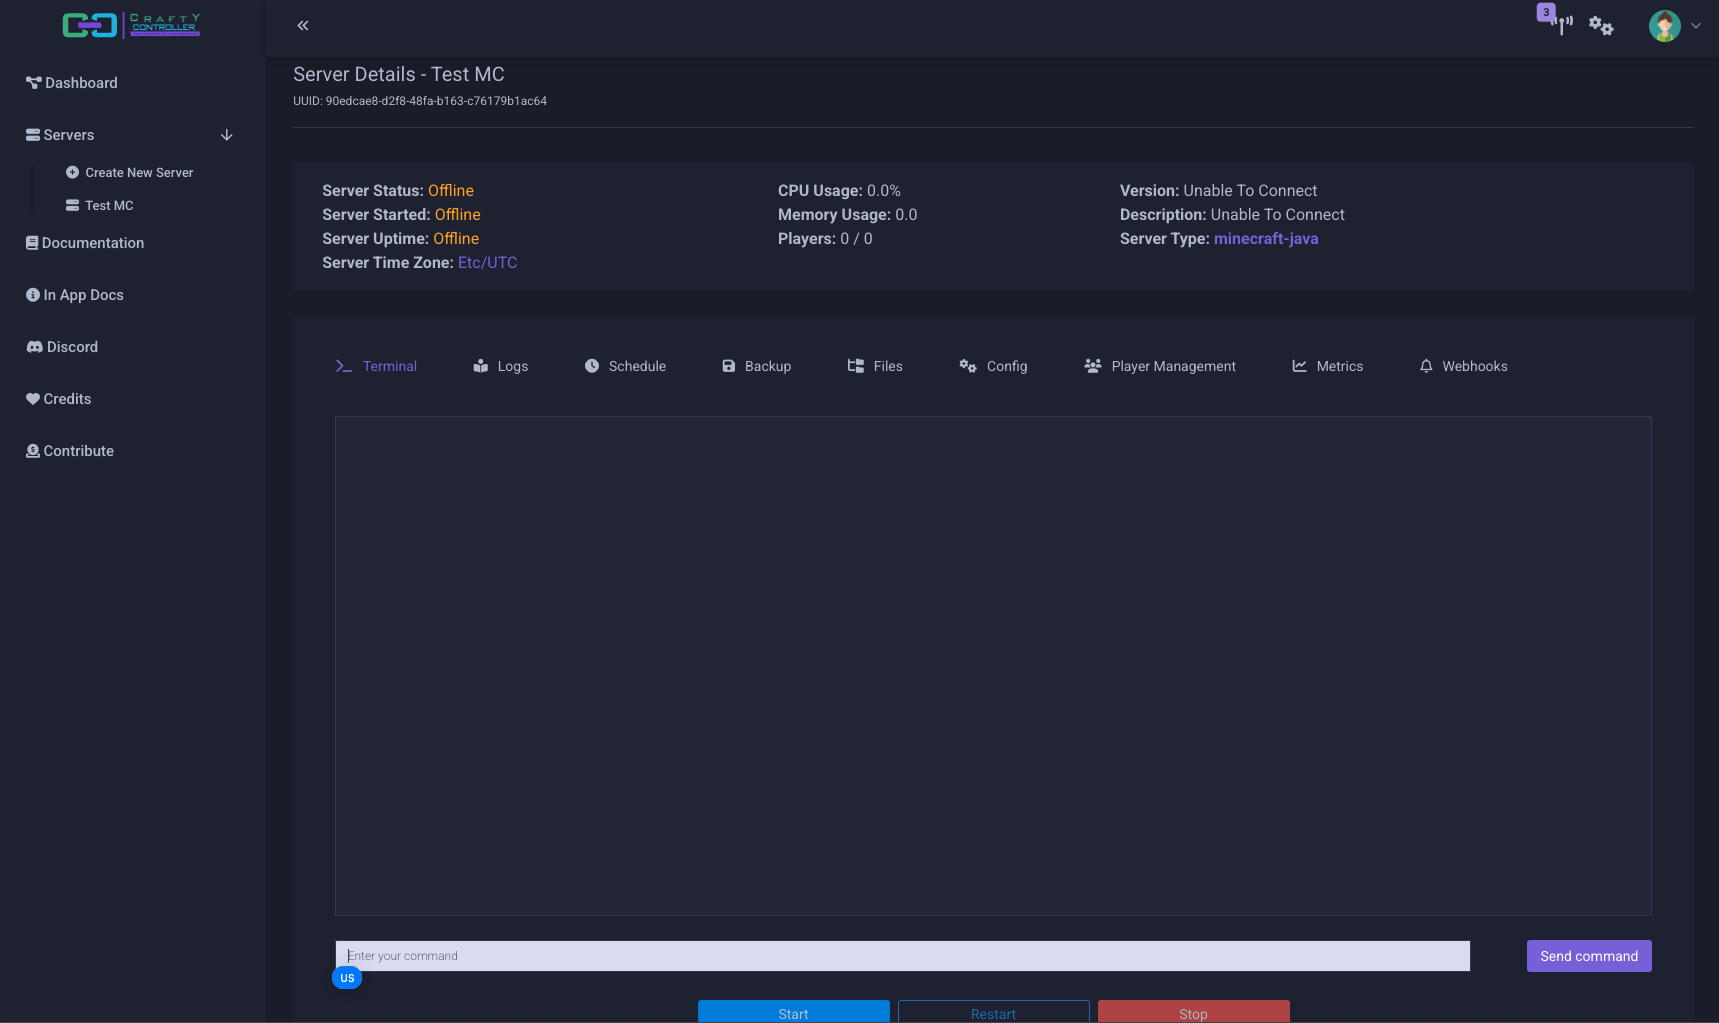
8. Create our first Minecraft server
Click on "Create New Server"
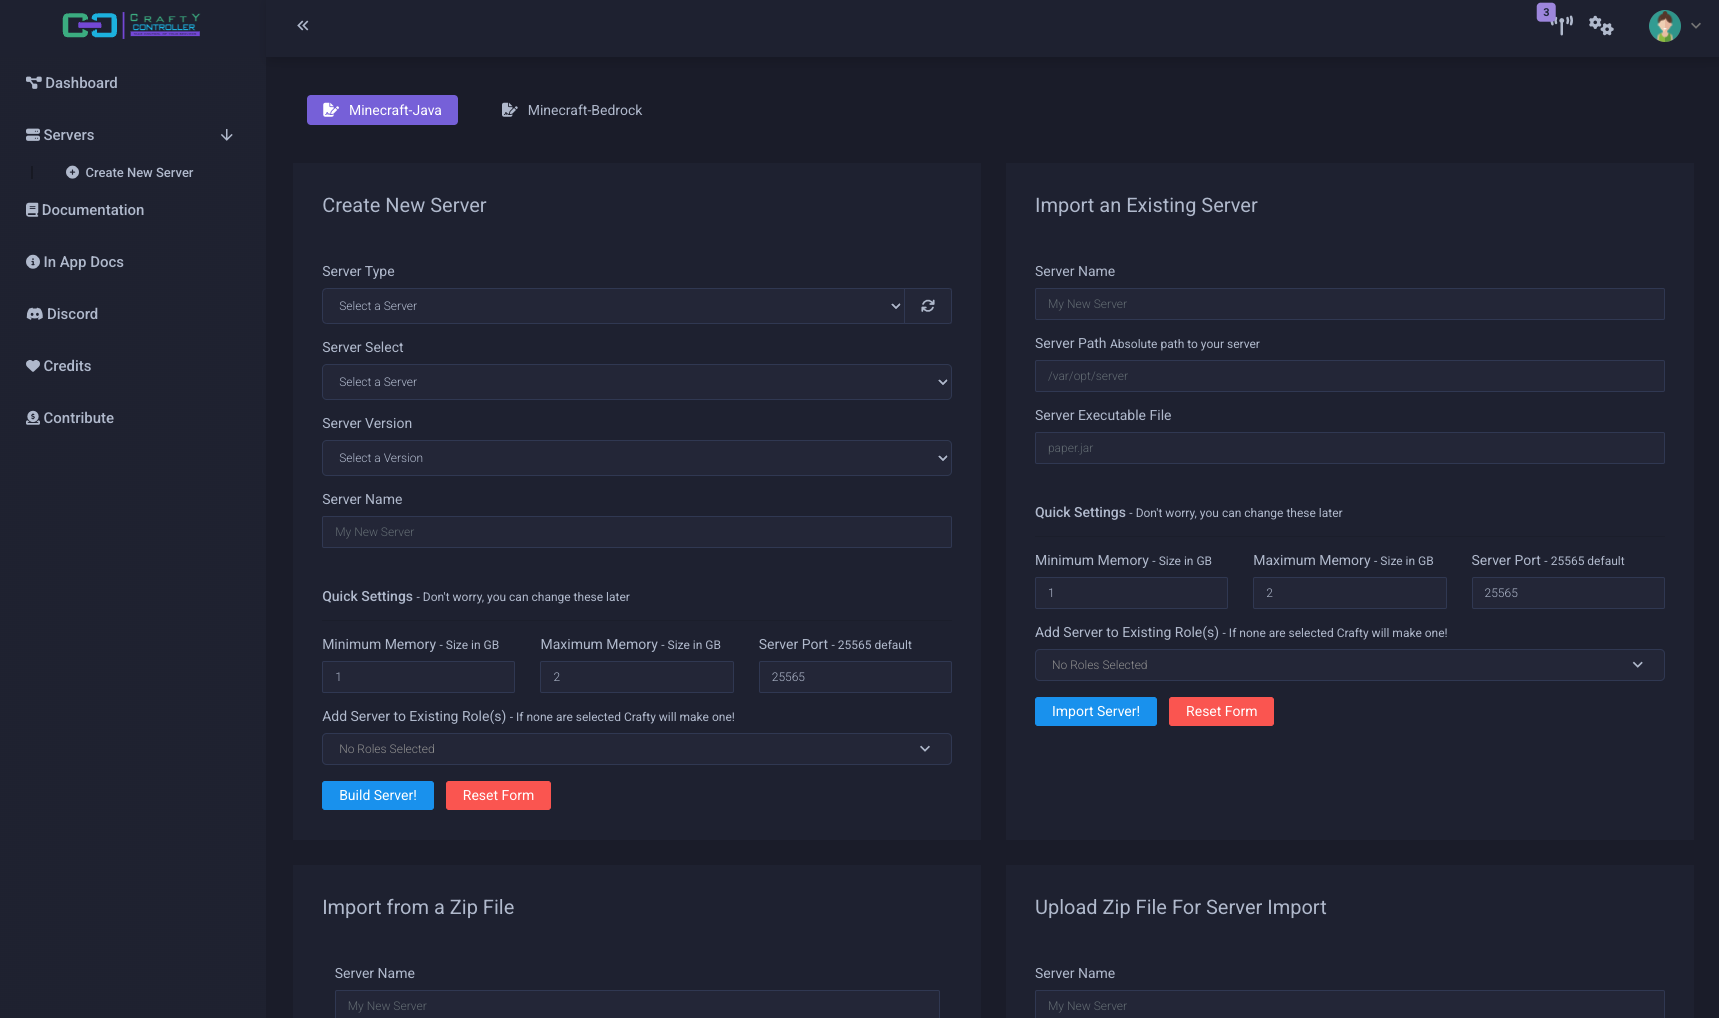
Follow these steps:
- Select server type
- Minecraft Server, Minecraft Proxy
- Select server
- Vanilla, forge, paper, etc...
- Select a Server Version
- 1.18.2, ....
- Set a server name
- Test MC
- Select Maximum Memory for this server and set port if necessary
- I put 4 GB for testing
- Click "Build Server"
After you click "Build Server" you will see your new server listed in the dashboard
Click on the server name and start the server for the very first time
9. Open Minecraft and connect to the server
Open minecraft
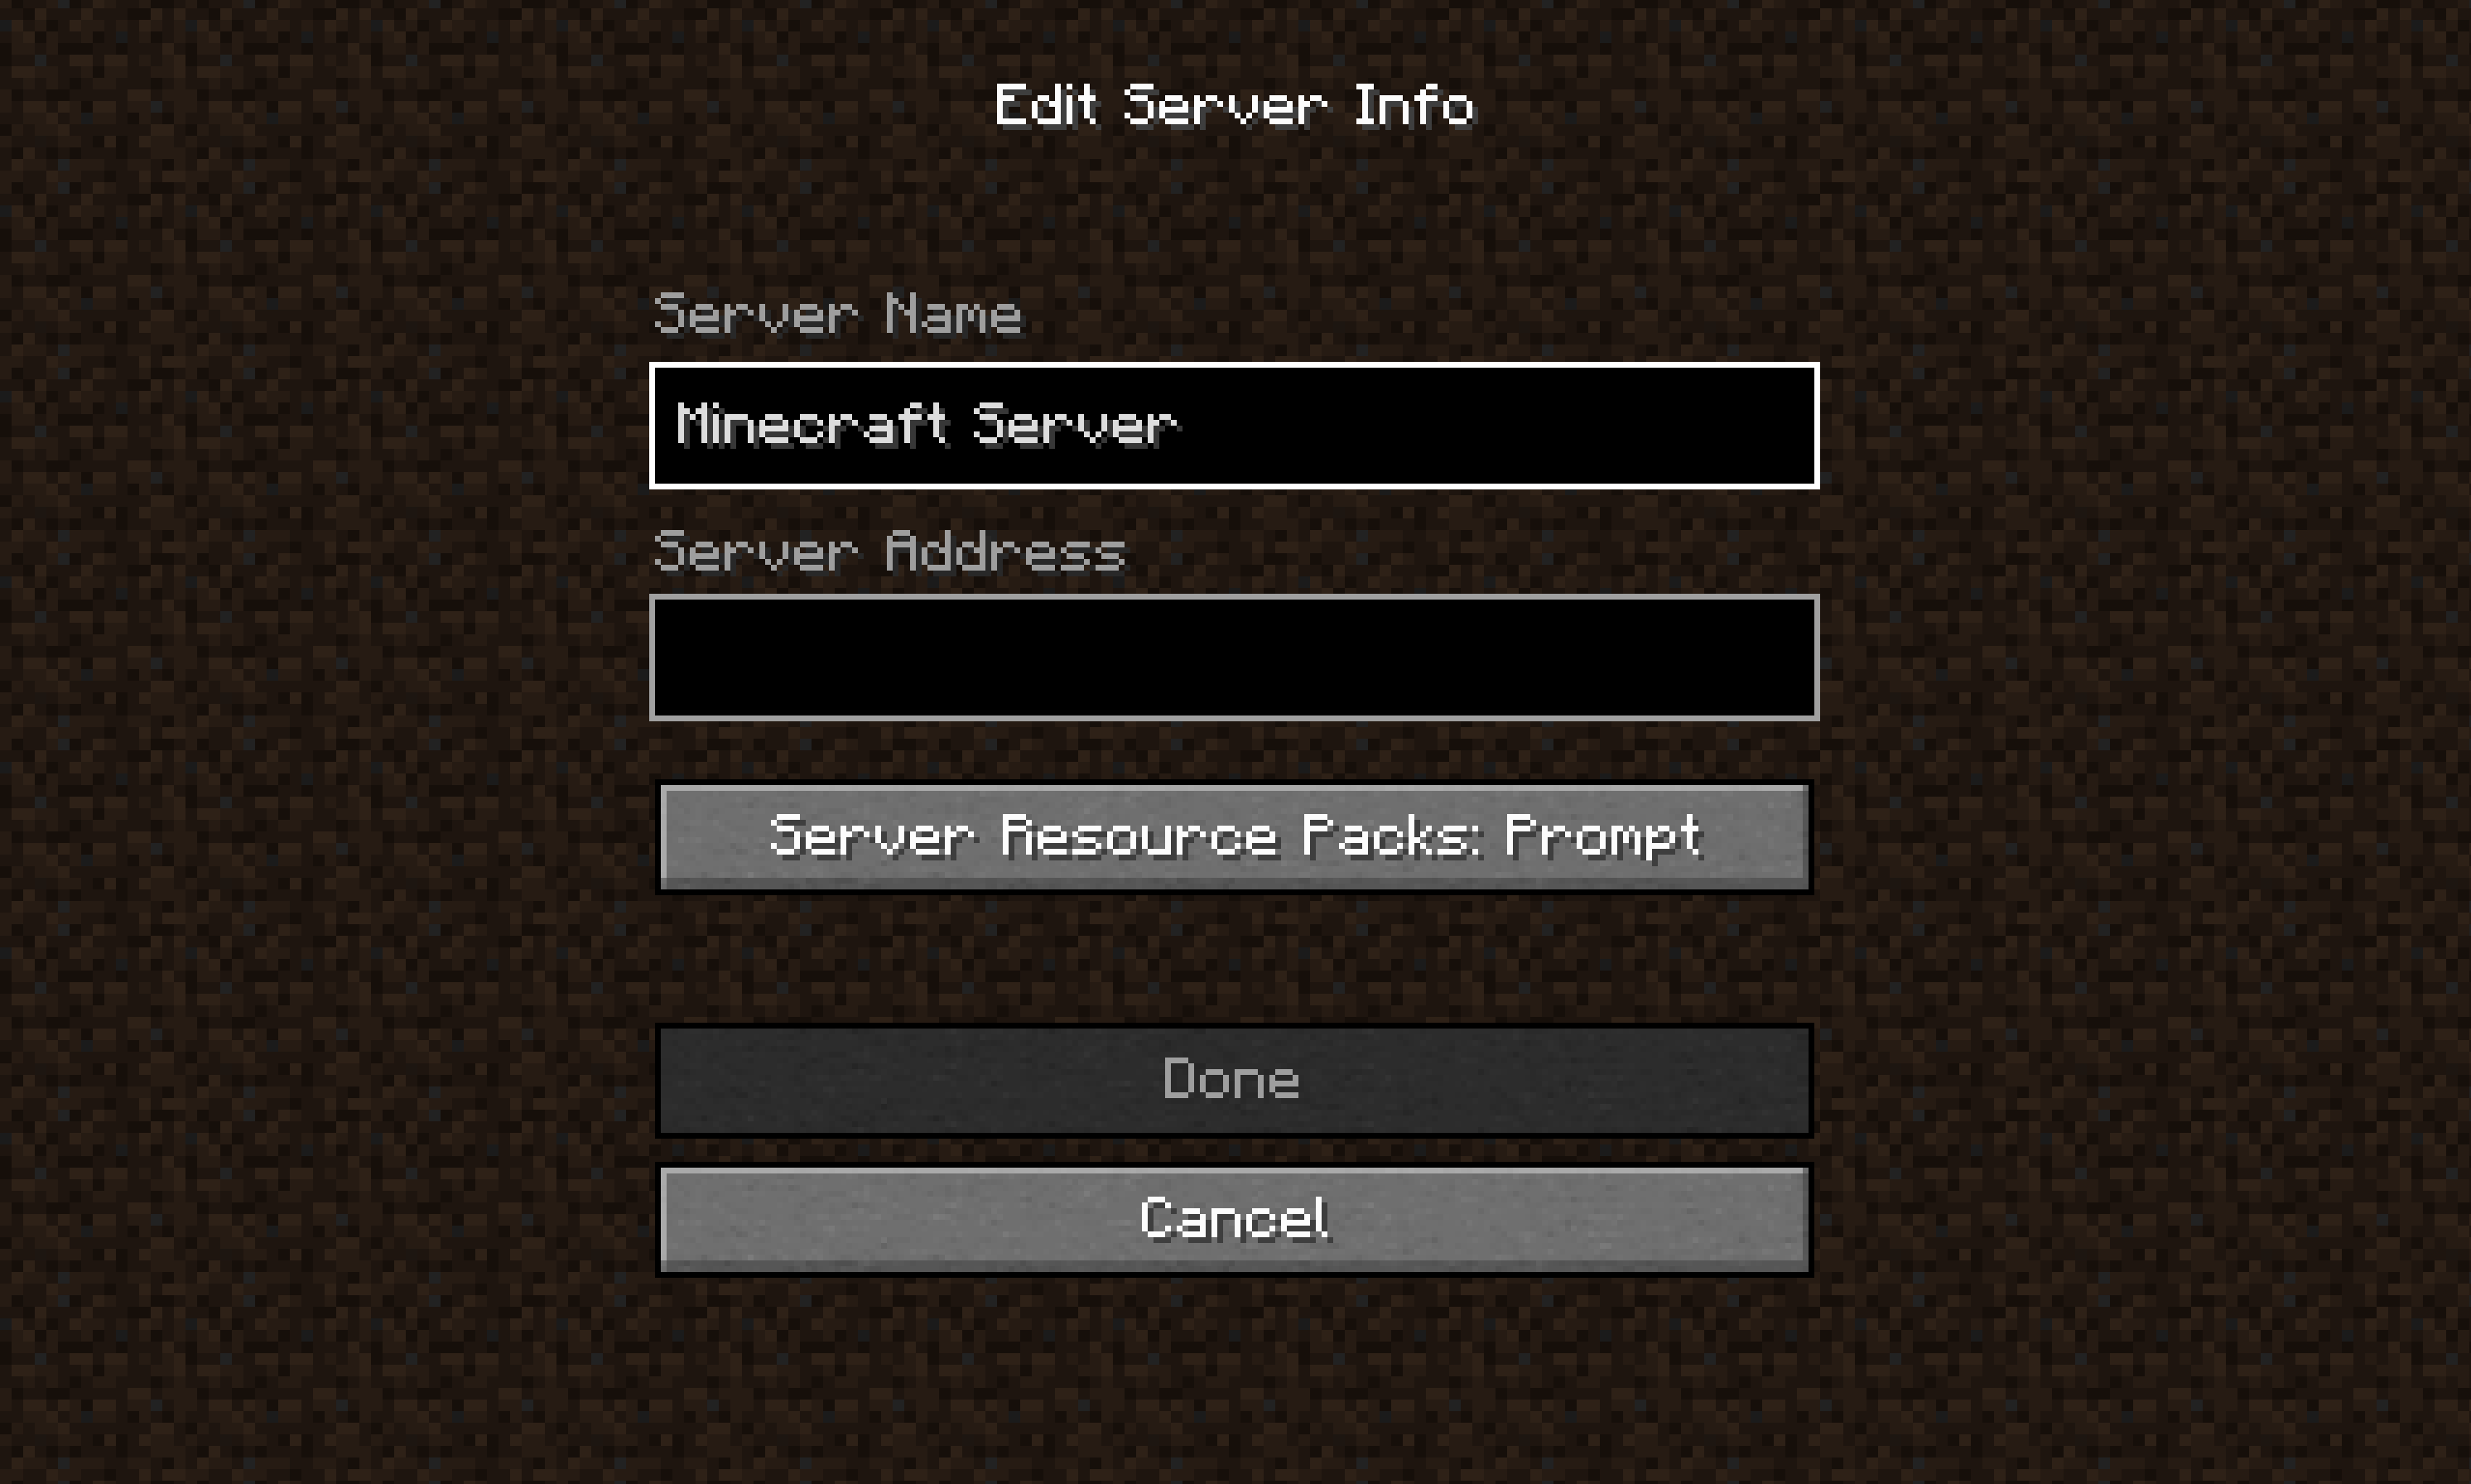
Server Name: Test MC
Server Address: 192.168.101.186:30065
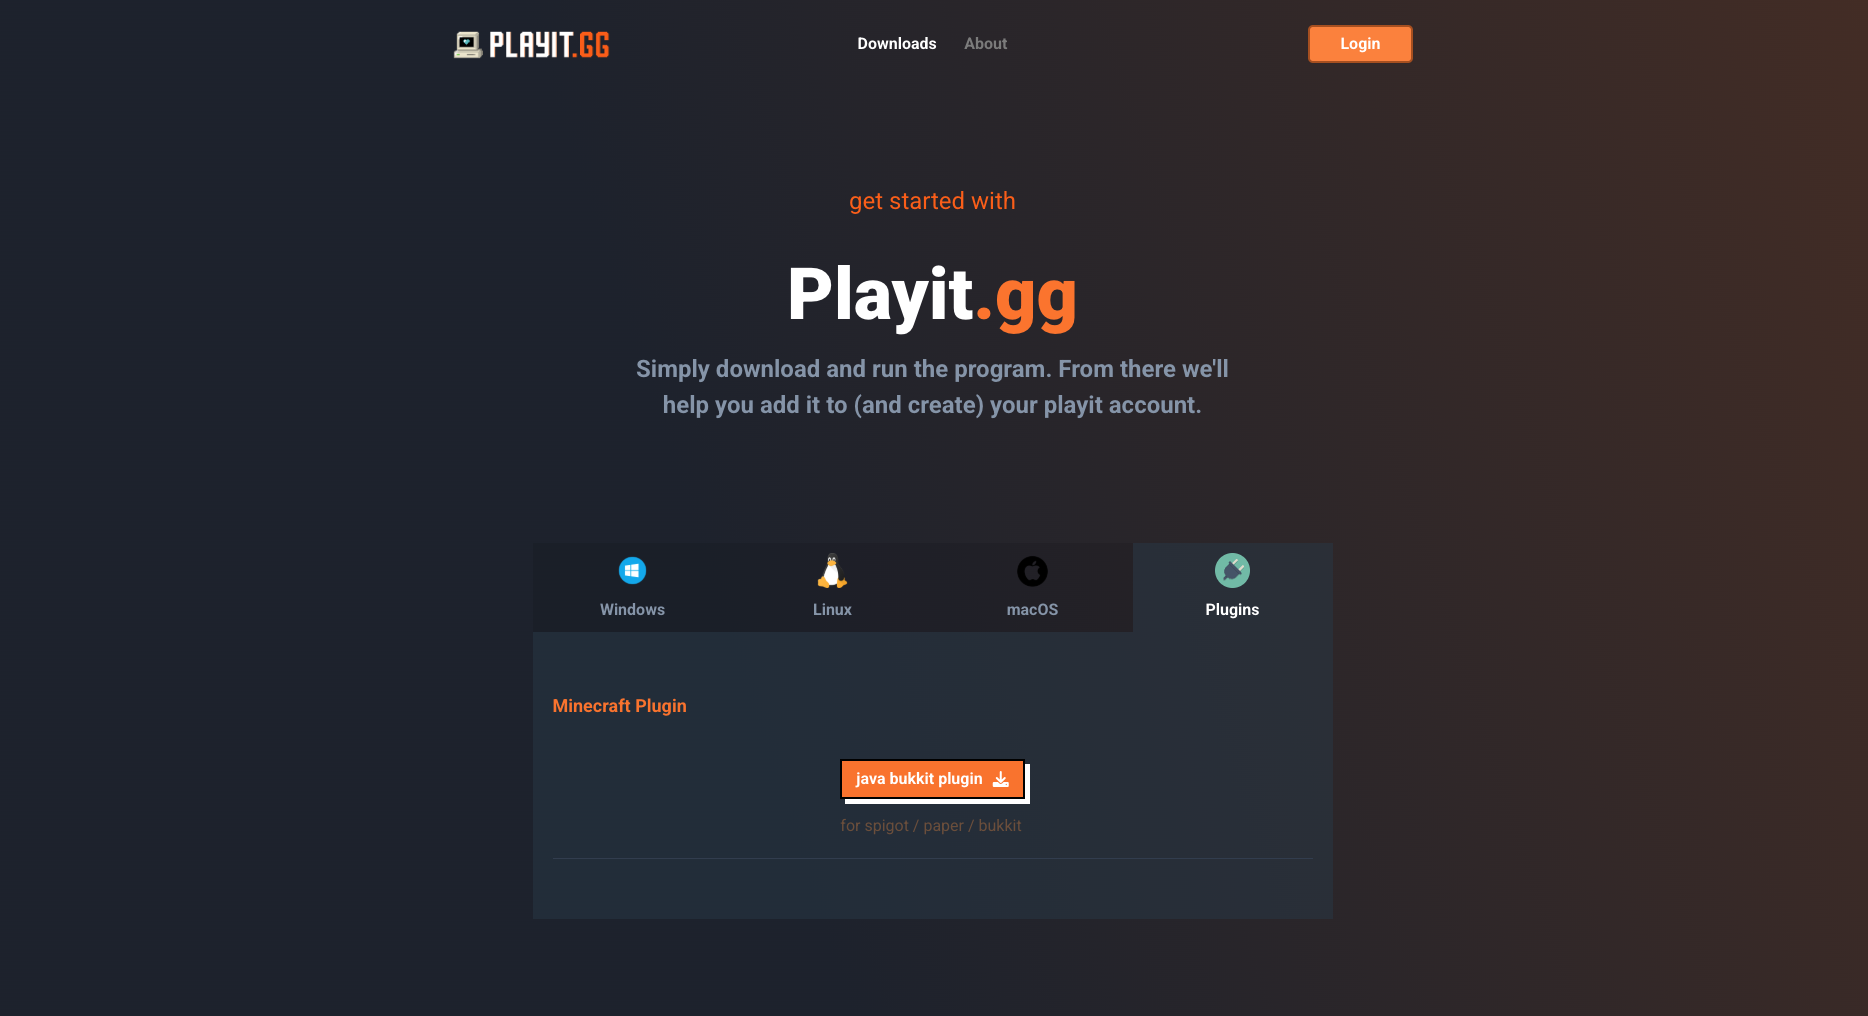
10. Expose server to the outside world with playit.gg
- Go to playit.gg
- Log in/Create account
- Go to "Downloads" and select "Plugins"
- Download "java bukkit plugin"
- Go to Crafty Controller, Click on the server name, stop the server and click on "Files"
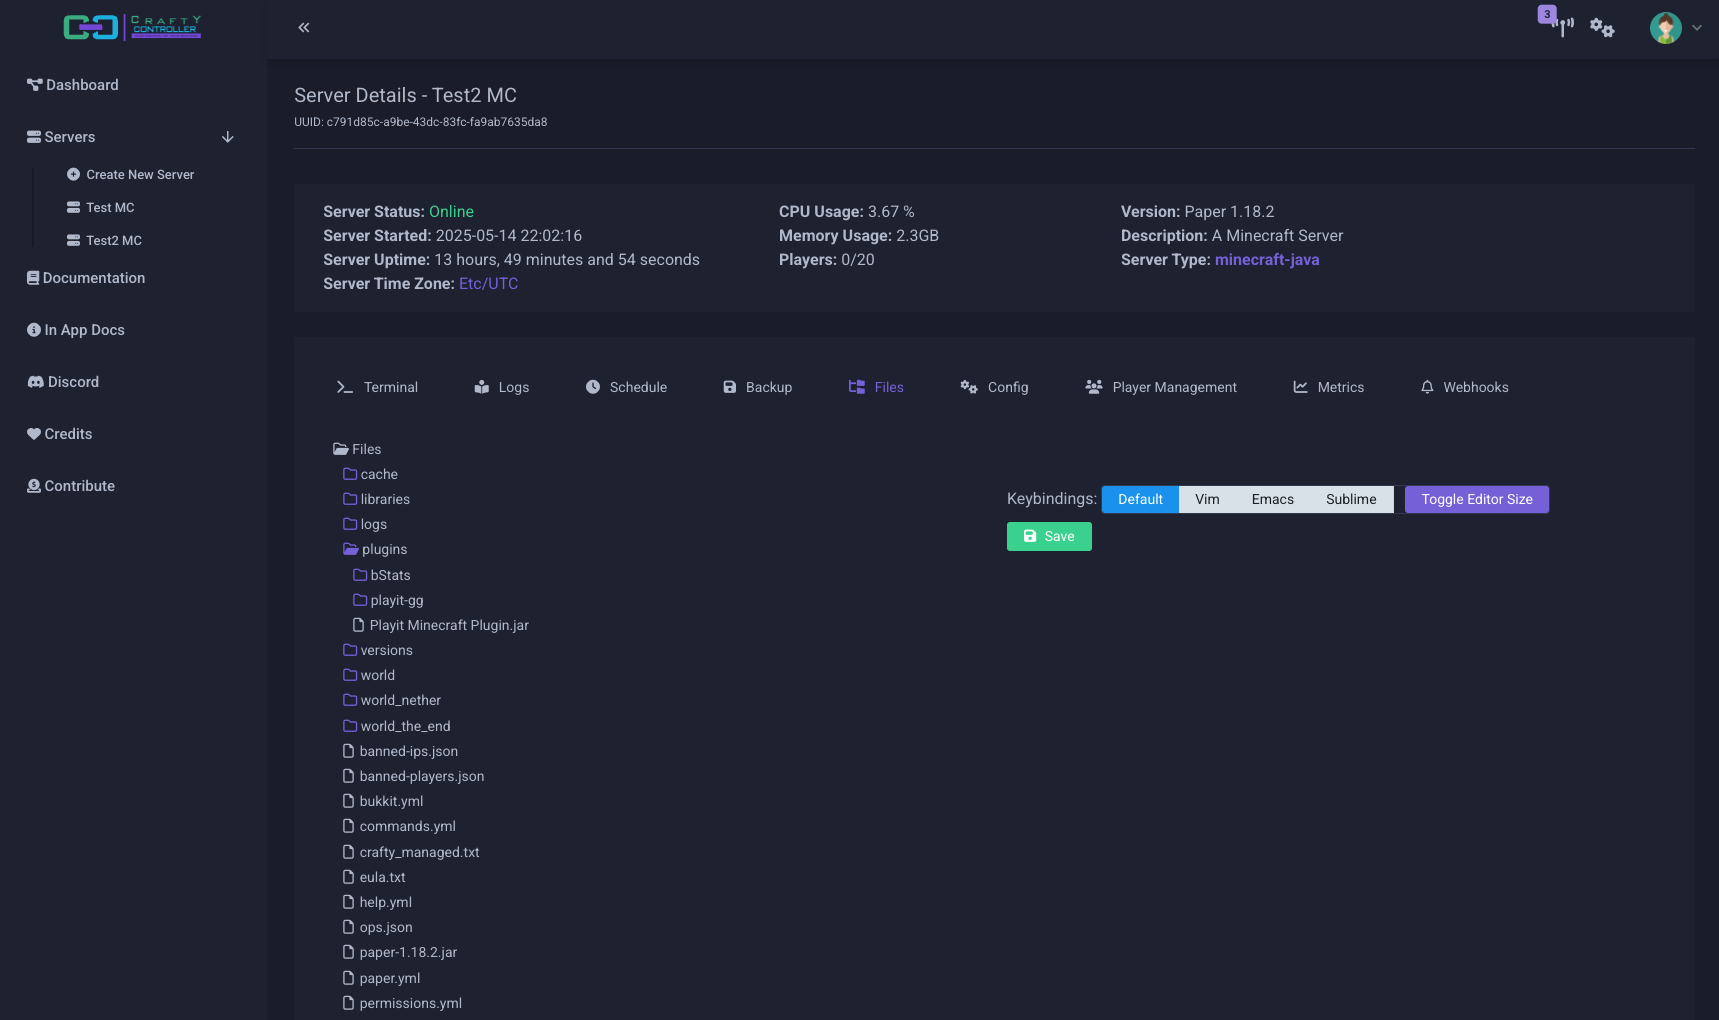
- Right-click on the "plugins" folder and click on Upload, then select the playit.gg java plugin.
- Go to "Terminal" and start the server
- View the logs and open the link under a message from
[gg.playit.minecraft.PlayitTcpTunnel] - On the link, go trough the steps to claim the tunnel. It can take some minutes, at the end of this process the tunnel link to the server will be displayed
name-surrounded.joinmc.link - Start Minecraft, go to Multiplayer and Add Server
- Server Name: You can put whatever the name you want to the server
- Server Address: use the link provided by playit.gg: name-surrounded.joinmc.link
- Now You and all of your friends can play in your server using this link!
11. Install Forge Mods on your Minecraft Server
To add Forge mods to your Minecraft server running through Crafty Controller, you'll need to follow these steps:
1. Install Forge on Your Server
Before you can add mods, your server needs to be set up with Forge, which is a modding platform for Minecraft.
- Download the version of Forge that matches the Minecraft version your server is running.
- Run the Forge installer on your server. Select "Install Server" and specify the folder where your Minecraft server is located.
- After installing, a new
forge.jarfile will be created in the server directory.
2. Add Mods to Your Server
Once Forge is installed, you can begin adding mods:
- Download the mods you want to use. Ensure they are compatible with the Minecraft and Forge version you're using.
- Inside your server directory, you should now have a
modsfolder. If not, create a new folder namedmods. - Place your downloaded
.jarmod files into themodsfolder.
3. Configure Crafty Controller to Use Forge
Now that you have Forge installed and mods in place, you'll need to ensure that Crafty Controller is configured to use the Forge server:
- In the Crafty Controller UI, go to the Server Settings.
- Under Java Arguments (or similar settings), make sure it points to the
forge.jarfile, which should be in your server directory. - If you're running multiple servers or profiles, make sure the correct profile is selected to launch the Forge server with mods enabled.
4. Restart Your Server
After configuring the Crafty Controller, restart your server through the Crafty UI. Your server should now be running with Forge and the mods you've added.
5. Client-Side Mods (for Players)
Players joining your server will need to install the same mods on their own Minecraft client. They can do this by installing the Forge client version and placing the same mods into their mods folder.
12. Setup a docker based playit.gg agent on a Kubernetes environment
1. Grab your Service's internal address
kubectl get svc minecraft-server -n crafty \
  -o jsonpath='{.spec.clusterIP}'
Suppose it prints:
10.96.72.34
2. Copy your playit.gg secret key
On the Playit.gg dashboard under the Agents tab click on "setup a docker based agent", copy your SECRET_KEY (the long alphanumeric value).
example docker-compose.yml
version: '3'

services:
  playit:
    image: ghcr.io/playit-cloud/playit-agent:0.15
    network_mode: host
    environment:
    - SECRET_KEY=165dd89d7d43aca18a78bafaeec1528b567676e70ccf04169d76db928d979c8a
- Do not worry about this, this is waht appears when you click on "setup a docker based agent". From this you just need to get your secret key and the image URL.
3. Create a Deployment manifest
Make a file called playit-agent.yaml with this content. Replace the placeholders exactly as shown:
vi playit-agent.yaml
File editor:
apiVersion: apps/v1
kind: Deployment
metadata:
  name: playit-agent
  namespace: crafty
spec:
  replicas: 1
  selector:
    matchLabels:
      app: playit-agent
  template:
    metadata:
      labels:
        app: playit-agent
    spec:
      containers:
      - name: playit-agent
        image: ghcr.io/playit-cloud/playit-agent:0.15
        env:
        - name: SECRET_KEY
          value: "3f18720969048db5f5bcdbcd34f5ee5b0073159f7accd7dbc504a13a9a2923ee"
        - name: LOCAL_ADDR
          value: "10.106.122.60"    # <-- your ClusterIP from step 1
        - name: LOCAL_PORT
          value: "25565"          # <-- Minecraft’s listen port
~
~
~
~
:
4. Apply the deployment file
kubectl apply -f playit-agent.yaml
Watch it come up
kubectl get pods -n crafty -l app=playit-agent
Output:
NAME                           READY   STATUS    RESTARTS   AGE
playit-agent-6667d94bf-8kvzj   1/1     Running   0          37s
Verify the logs
kubectl logs -f deployment/playit-agent -n crafty
Output:
2025-05-19T02:16:49.657903Z INFO playit_cli::ui: playit (v0.15.26): 1747621009657 tunnel running, 1 tunnels registered
Now the playit.gg pod is running and the tunnel is setup properly. You can share the address provided by playit.gg with your friends and start playing at this point.
13. (Optional) Troubleshoot playit.gg service
To restart the playit.gg service:
kubectl rollout restart deployment/playit-agent -n crafty
14. (Optional) Configure backups using chronyd
Create a CronJob manifest file
vi crafty-backup-cronjob.yam
CronJob manifest
apiVersion: batch/v1
kind: CronJob
metadata:
  name: crafty-backup
  namespace: crafty
spec:
  schedule: "0 3 * * *"         # daily at 03:00
  concurrencyPolicy: Forbid
  jobTemplate:
    spec:
      template:
        spec:
          restartPolicy: OnFailure
          containers:
          - name: backup
            image: busybox
            command:
            - sh
            - -c
            args:
            - |
              TIMESTAMP=$(date +"%Y-%m-%d_%H%M")
              echo "Backing up world data…"
              tar czf /backups/world-${TIMESTAMP}.tgz -C /crafty/data .
              echo "Backing up Crafty config…"
              tar czf /backups/config-${TIMESTAMP}.tgz -C /crafty/app/config .
            volumeMounts:             # ← here, under the container
            - name: crafty-data
              mountPath: /crafty/data
            - name: crafty-config
              mountPath: /crafty/app/config
            - name: backup-dest
              mountPath: /backups
          volumes:
          - name: crafty-data
            persistentVolumeClaim:
              claimName: crafty-pvc
          - name: crafty-config
            hostPath:
              path: /mnt/data/crafty/config
              type: Directory
          - name: backup-dest
            hostPath:
              path: /mnt/data/crafty-backups
              type: DirectoryOrCreate
- Save that as
crafty-backup-cronjob.yaml.
Apply it with your normal user (no sudo):
kubectl apply -f crafty-backup-cronjob.yaml
kubectl get cronjob -n crafty
(Optional) Trigger a test run:
kubectl create job --from=cronjob/crafty-backup crafty-backup-test -n crafty
kubectl get jobs -n crafty
Check your host /mnt/data/crafty-backups for the newly created .tgz files.
macc@craftlab:/mnt/data/crafty-backups$ ls
config-2025-05-26_0519.tgz  world-2025-05-26_0519.tgz
With this fix, volume mounts are legal in the schema and your backups directory will fill with timestamped archives without ever being overwritten.
15. (Optional) In case of forgetting admin password
Grab the default admin creds
Crafty generates a random password on first-run and writes it into default-creds.txt. To fetch them:
# get your Crafty pod name
POD=$(kubectl get pods -n crafty -l app=crafty -o jsonpath='{.items[0].metadata.name}')

# print the initial admin/user and password
kubectl exec -n crafty $POD -- cat /crafty/app/config/default-creds.txt
You will see something like:
{
    "username": "admin",
    "password": "#NElFL##gTk5$Fg169IUjq%7vqAYsf0vc2tpo%wACtJIo22*&&c%skPYQTs^*b1y",
    "info": "This is NOT where you change your password. This file is only a means to give you a default password."
Now you will be able to log in to the Crafty UI using these credentials.
16. (Optional) Checking the server files in the terminal
First use the following command to get the name of the POD
POD=$(kubectl get pods -n crafty -l app=crafty -o jsonpath='{.items[0].metadata.name}')
Run the following command to get your server UUID (You can also see this in the Crafty UI)
kubectl exec -n crafty $POD -- ls /crafty/servers
You will get something like:
b6fd9057-71e1-4d1e-ae9e-247162b781c1
Then assign a variable to store this ID (optional)
SERVER_UUID=$(kubectl exec -n crafty $POD -- ls /crafty/servers)
To list the server files you just need to do the following:
kubectl exec -n crafty $POD -- ls -ltR /crafty/servers/$SERVER_UUID | head -n 20
Output:
/crafty/servers/b6fd9057-71e1-4d1e-ae9e-247162b781c1:
total 1048
drwxr-sr-x  2 crafty root   4096 May 26 18:52 db_stats
drwxr-sr-x 10 crafty root   4096 May 26 18:48 world
-rw-r--r--  1 crafty root      2 May 26 18:48 ops.json
-rw-r--r--  1 crafty root      2 May 26 18:48 whitelist.json
-rw-r--r--  1 crafty root      2 May 26 18:48 banned-ips.json
-rw-r--r--  1 crafty root      2 May 26 18:48 banned-players.json
-rw-r--r--  1 crafty root      2 May 26 18:48 usercache.json
-rw-r--r--  1 crafty root   1143 May 26 18:48 server.properties
drwxr-sr-x  2 crafty root   4096 May 26 18:48 config
drwxr-sr-x  2 crafty root   4096 May 26 18:48 defaultconfigs
drwxr-sr-x  2 crafty root   4096 May 26 18:48 mods
drwxr-sr-x  2 crafty root   4096 May 26 18:48 logs
-rw-r--r--  1 crafty root      9 May 26 18:48 eula.txt
-rw-r--r--  1 crafty root 997937 May 26 18:43 forge-installer-1.18.2.jar.log
drwxr-sr-x 11 crafty root   4096 May 26 18:43 libraries
-rw-r--r--  1 crafty root    363 May 26 18:43 run.bat
-rwxr--r--  1 crafty root    366 May 26 18:43 run.sh
-rw-r--r--  1 crafty root    339 May 26 18:43 user_jvm_args.txt
17. (Optional) Testing persistence (ensuring no overwrite on restart)
Verifying that that your world and server data truly survive any Pod restart:
1. Note your server’s UUID and world contents
Get the Pod name and your server’s UUID directory:
POD=$(kubectl get pods -n crafty -l app=crafty -o jsonpath='{.items[0].metadata.name}')
SERVER_UUID=$(kubectl exec -n crafty $POD -- ls /crafty/servers)
List the server files inside the pod:
kubectl exec -n crafty $POD -- ls -ltR /crafty/servers/$SERVER_UUID/ | head -n 20
2. Delete the Crafty Pod
Since the server is managed by a Deployment with replicas: 1, deleting the Pod will immediately cause the Deployment controller to spin up a brand-new Pod in its place.
Delete the current Crafty Pod
kubectl delete pod -n crafty $POD
kubectl get pods -n crafty --watch
Wait until the new crafty-xxxxx Pod is Running.
Output:
NAME                            READY   STATUS      RESTARTS       AGE
crafty-664d488db-6cz4z          1/1     Running     0              31m
crafty-backup-test-9rx9n        0/1     Completed   0              14h
playit-agent-6456d7b889-lvfxc   1/1     Running     1 (2d4h ago)   7d14h
3. Re-verify inside the new Pod
List the same server files again in the new Pod
NEW_POD=$(kubectl get pods -n crafty -l app=crafty -o jsonpath='{.items[0].metadata.name}')
kubectl exec -n crafty $NEW_POD -- ls -ltR /crafty/servers/$SERVER_UUID/world | head -n 20
Compare that output to what you saw before deleting the Pod. They should be identical (same total number of files).
4. Check on the host
On your Ubuntu host, you can also inspect the PV’s data directly:
ls -R /mnt/data/crafty-servers/$SERVER_UUID/ | head -n 20
Again, it should match exactly.
Output:
/mnt/data/crafty-servers/b6fd9057-71e1-4d1e-ae9e-247162b781c1:
banned-ips.json
banned-players.json
config
crafty_managed.txt
db_stats
defaultconfigs
eula.txt
forge-installer-1.18.2.jar.log
journeymap
libraries
logs
modernfix
mods
ops.json
patchouli_books
run.bat
run.sh
server.properties
structurize
Conclusion
/crafty/serversis mounted to yourcrafty-servers-pvc, so deleting the Pod never touches those files.- A new Pod coming up re-mounts the same volume, giving you back all your world data and server state.
Once you see that the world files persist through a Pod deletion, you can be confident no future restarts—whether manual, automatic, or cluster upgrades—will erase your server or world.